True Opens (TDO/TWO/NYAM etc.)+ First FVG - Milana TradesThis indicator combines multiple "True Open" levels with the visualization of the first Fair Value Gap (FVG) following key market opens.
Key Features:
True Opens (TDO, TWO, TAO, TLO, NYAM, TNY):
TDO (True Day Open): Displays the start of the trading day (00:00 NY time) with customizable line style, color, and label.
TWO (True Weekly Open): Marks the start of the week (Monday 18:00 NY time) with visual lines and optional labels.
TAO (True Asian Open): Highlights the opening of the Asian session (19:30 NY time), allowing traders to track early Asian session activity.
TLO (True London Open): Marks London session open (01:30 NY time), providing insight into the first European market activity.
NYAM (New York AM Open): Marks 09:30 NY time, often a key liquidity spike period.
TNY (True New York Open): Highlights the full New York session open (07:30 NY time), useful for pre-market and early NY session trading.
All lines are fully customizable in color, style, width, and label visibility. Lines can also be extended to the right for better visual tracking.
First FVG After Open:
Automatically detects the first Fair Value Gap (FVG) following each session open.
Supports both bullish and bearish FVGs, displayed with distinct colors and transparency.
Mitigation detection highlights gaps that have already been touched or partially filled, using a softer color for clarity.
Why the first FVG matters:
The first gap after an open often indicates the initial imbalance of the session.
These gaps can act as high-probability zones for retracement or continuation trades, providing early-session trade opportunities.
Daily & Weekly Initial Range Boxes:
Visualize daily (00:00–01:00 NY) and weekly (Monday 18:00–19:00 NY) initial ranges.
Boxes update dynamically with price movement during the session.
Optional range info in pips to quantify volatility and potential targets.
Customizable Appearance:
Choose colors for bullish, bearish, and mitigated FVGs.
Adjust line styles (solid, dashed, dotted), widths, labels, and extensions for all opens.
Transparency settings for IB boxes allow clear chart readability without clutter.
Historical Options:
Enable prior day/week visualization to analyze session behavior and recurring patterns.
Why Traders Use This Indicator:
Early session clarity: Knowing the true session opens and first FVGs helps traders spot high-liquidity zones and potential reversals.
Structure-based trading: Combines session open levels with FVGs, aligning with professional market structure strategies.
Pesquisar nos scripts por "weekly"

Advanced ICT ADR Projections [bilal]📊 Overview
Professional ADR indicator designed specifically for index futures traders. Calculate and visualize Average Daily Range with multiple session options, fractional levels, and higher timeframe context.
✨ Key Features
🎯 Multiple Session Types
Full Day: Standard calendar day calculation
Midnight: Anchored to 00:00 NY time open
RTH (Regular Trading Hours): 09:30-16:00 NY session
Custom: Define your own session hours and anchor point
📐 Projection Levels
100% ADR Levels: Upper and lower range targets from anchor
Fractional Levels: 33% and 66% zones for partial targets
Custom Mirrored Levels: Set any percentage (0-200%) with automatic mirroring
Example: 25% shows both 25% and 75%
Example: 111% shows both 111% and -11%
📅 Higher Timeframe Context (Optional)
AWR: Average Weekly Range overlay
AMR: Average Monthly Range overlay
AYR: Average Yearly Range overlay
All HTF ranges use same anchor as daily session
📊 Information Table
Current session type and anchor time
ADR value for selected period
Current range and percentage used
Distance remaining to ADR targets (up/down)
Color-coded range percentage (green/orange/red)
🎨 Fully Customizable
Line colors, styles (solid/dashed/dotted), and widths
Toggle labels on/off
Adjustable ADR lookback period (1-100 days)
All HTF periods customizable
⚡ Smart Features
Lines start at actual session open (not fixed lookback)
Works on any timeframe
Real-time range tracking
Alert conditions when ADR reached or exceeded
🎯 Use Cases
For Day Traders:
Set profit targets at ADR extremes
Identify range expansion vs rotation days
Know when you've used 75%+ of daily range (possible reversal)
Compare RTH vs full day ranges
For Swing Traders:
Use AWR/AMR for weekly/monthly targets
Understand if today's move is significant in weekly context
Multi-timeframe confluence
Risk Management:
Size positions based on % of ADR remaining
Avoid trading when ADR exhausted (>100%)
Better stop placement using fractional levels
💡 Trading Tips
<50% ADR used = Room to run (continuation trades)
50-75% ADR used = Getting extended (scale out)
75-100% ADR used = Near extremes (reversal setups)
>100% ADR = Expansion day (trend day or volatility spike)
Use fractional levels (33%, 66%) as:
Partial profit targets
Re-entry zones on pullbacks
Confluence with other support/resistance
Compare RTH vs Full Day ADR to see if overnight or day session drives volatility.
⚙️ Settings Guide
ADR Period: 5 days is standard, adjust for different market regimes
Session Types:
Use Midnight for crypto or 24hr markets
Use RTH for pure day session analysis
Use Custom for specific session times (London, Asia, etc.)
Custom Levels:
Set 25% for quartile levels
Set 111% for extended targets beyond ADR
Experiment with 50%, 75%, 80% for your strategy
Perfect for ES, NQ, YM, RTY futures traders who need precise intraday range analysis with higher timeframe context!

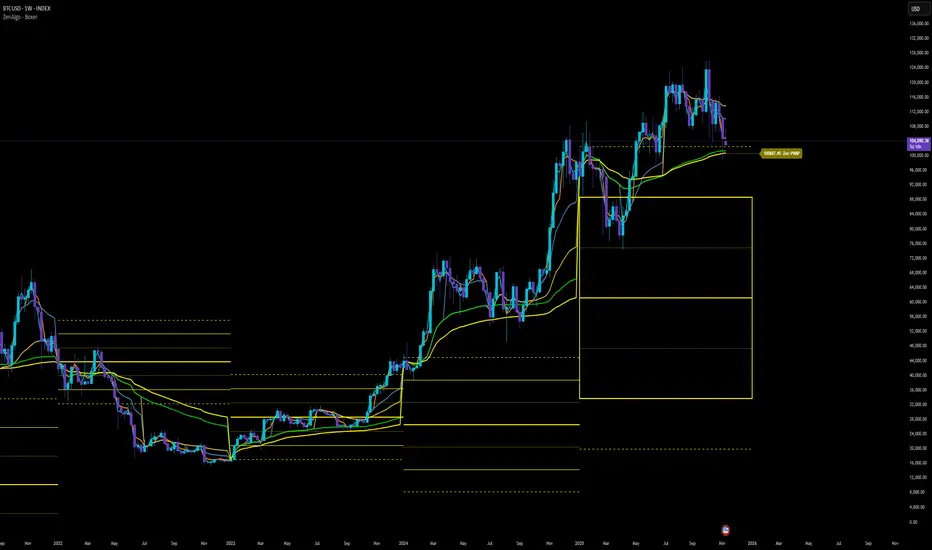
ZenAlgo - BoxerThis indicator plots multi-period Volume-Weighted Average Price (VWAP) ranges and deviation bands across several timeframes — specifically weekly, monthly, quarterly, semi-annual, and yearly. It is designed to visualize how price evolves relative to statistically weighted value areas within each period, based on both traded price and volume distribution.
Each timeframe layer is drawn independently, using its own cumulative VWAP and standard deviation calculation, and displayed as horizontal ranges aligned precisely with calendar periods. This structure allows the chart to show where price currently trades relative to past value zones and how each higher-timeframe VWAP acts as a dynamic reference for mean reversion or continuation.
Calculation Logic
1. Source and Base Inputs
The indicator uses the average of high, low, and close as its price source.
Stocks reset daily at session open.
2. VWAP and Deviation Computation
For each active timeframe, it accumulates the product of price and volume and divides it by cumulative volume, forming a continuously updated VWAP within that period.
The dispersion of price around VWAP is measured through a volume-weighted variance, converted to standard deviation.
These values form symmetrical bands around the VWAP (±1σ, ±2σ, etc.), describing the statistically typical price spread.
3. Range Drawing and Persistence
When a new period begins (e.g., a new week or month), the script finalizes the previous VWAP and deviation values, fixes them to time coordinates representing the full duration of that completed period, and draws corresponding lines or boxes across the entire range.
The user can control how many historical periods remain visible, ensuring performance and clarity even on high-frequency charts.
Each band can be toggled independently (for example ±1, ±2, ±3 deviations), and colors are adjustable per timeframe.
4. Adaptive Time Anchors
The start of each timeframe is aligned with calendar boundaries.
For stocks, the start time aligns with 9:30 New York time to coincide with market open for NYSE.
Each new anchor triggers a reset of cumulative data and creation of a new VWAP range.
5. Visualization Structure
The weekly layer is drawn first and can optionally display live VWAP bands extending backward for a user-defined number of weeks.
Monthly, quarterly, semi-annual, and yearly layers use the same computation principle but with independent accumulation windows.
The central VWAP line is dashed, while outer deviation levels are drawn as dotted or solid lines depending on their multiplier.
Boxes are rendered for key deviation intervals (e.g., ±2σ) to highlight broader value zones.
Interpretation
The VWAP represents the mean price weighted by traded volume for the given period.
Deviation bands describe statistically typical distance from that mean; outer bands mark less frequent extremes.
When price remains within ±1σ or ±2σ, it suggests balance around fair value.
Repeated touches or breaks beyond outer deviations indicate expansion or compression of volatility relative to prior periods.
Overlaps of VWAPs from multiple timeframes reveal multi-period confluence zones, useful for observing where long-term and short-term value agree or diverge.
Recommended Timeframes by Range Type
Weekly Range
Recommended timeframe: 30m to 12h
Suggested options: 30m, 1h, 2h, 3h, 4h, 6h, 8h, 12h
Using lower timeframes (like 5m) is technically possible, but higher ones provide smoother visualization and better readability.
Monthly Range
Recommended timeframe: 1h to 1D
Suggested options: 1h, 2h, 3h, 4h, 6h, 8h, 12h, 1D
Lower timeframes such as 30m may not display the full monthly range due to TradingView’s bar limits, so use higher TFs for complete coverage.
Quarterly Range
Recommended timeframe: 4h to 1W
Suggested options: 4h, 6h, 8h, 12h, 1D, 1W
Quarterly ranges benefit from higher timeframes to ensure that enough historical data is visible without exceeding chart limits.
Semi-Annual Range
Recommended timeframe: 12h to 1M
Suggested options: 12h, 1D, 1W, 1M
Lower timeframes would require too many bars to load a full six-month range; higher TFs offer a clearer overview.
Yearly Range
Recommended timeframe: 1D to 1M or higher
Suggested options: 1D, 1W, 1M
Yearly ranges often cannot display correctly on low timeframes (e.g. 1h) because of TradingView’s maximum bar limits — for instance, five years of 1h data exceeds 40,000 bars. Use higher TFs for accurate rendering.
Added Value Compared to Common Free VWAP Indicators
Incorporates five independent timeframes simultaneously (week, month, quarter, half-year, year) with exact calendar anchoring and timezone handling.
Calculates volume-weighted deviation for each layer, maintaining consistent statistical scale across assets.
Provides historical box persistence , allowing comparison of completed VWAP structures instead of only current running lines.
Enables selective visibility, bandwidth control, and precise visual differentiation through adjustable colors and line weights.
Limitations and Notes
The indicator does not generate trading signals. It is purely analytical and descriptive.
On very low timeframes or illiquid assets, deviation values may fluctuate if volume data is inconsistent.
Historical boxes are approximate in length for months with fewer than 31 days; this simplification has negligible effect on interpretation.
High visual density may occur when enabling many deviations or timeframes at once; users should limit visible history for performance.
Best Usage Practices
Apply on intraday charts (5–240 min) to study how price interacts with weekly or higher-timeframe VWAP zones.
Observe convergence of VWAPs from multiple periods to locate significant equilibrium levels.
Use outer deviations to frame potential exhaustion or re-entry zones rather than directional predictions.
Combine with independent volume- or structure-based analysis for context.
High and low statisticsHigh/Low Pattern Analyzer (All Timeframes)
Ever wonder if there's a hidden pattern in the market?
Does the high of the week usually happen on a Tuesday?
Does the low of the month always form in the first week?
Which 15-minute candle really sets the high for the entire day?
This indicator is a powerful statistical tool designed to answer these questions by analyzing historical price action to find patterns in when the high and low of a period are formed.
The Core Idea: Daily High & Low of the Week
The simplest and most popular feature of this indicator is the "Daily high and low of the week" analysis.
What it does:
It looks back over your chosen number of weeks (e.g., the last 100) and finds out which day of the week (Monday, Tuesday, Wednesday, etc.) made the final high and which day made the final low for each of those weeks.
How to use it:
Go to the script settings.
Enable the "Daily High/Low of the Week" module.
Set your chart to the 1D (Daily) timeframe.
A table will appear on your chart (bottom-right by default) showing the exact count and percentage for each day. This lets you see at a glance if there's a strong tendency for the market you're watching.
Advanced Analysis: Other Timeframes
This script goes far beyond just the daily chart. It includes four other independent analysis modules:
1. 4-Hour High/Low of the Week
What it does: For intraday and swing traders. This module finds which 4-hour candle session (e.g., the 08:00 candle, the 16:00 candle) tends to form the high or low of the entire week.
Key Feature (DST Aware): This table is "season-aware." It knows that the 08:00 "summertime" (DST) candle is the same trading session as the 07:00 "wintertime" (STD) candle. It groups them together so your data is never split or messy.
2. Weekly High/Low of the Month
What it does: For a monthly perspective. This module finds which week of the month (Week 1, 2, 3, 4, or 5) is most likely to form the monthly high or low.
How to use: Enable it and set your chart to the 1W (Weekly) timeframe.
3. Monthly High/Low of the Year
What it does: The ultimate "big picture" view. This module finds which month (Jan, Feb, Mar, etc.) most frequently forms the high or low for the entire year.
How to use: Enable it and set your chart to the 1M (Monthly) timeframe.
The Power User Module: Custom Timeframe Analysis
This is the most powerful feature. It lets you analyze any timeframe combination you want.
What it does: It finds out which "Lower Timeframe" (LTF) candle made the high or low of any "Higher Timeframe" (HTF) you choose.
Example: Do you want to know which 15-minute candle makes the Daily high?
Set your chart to the 15M timeframe.
Go to the "Custom Timeframe Analysis" settings.
Set the "Higher Timeframe" to "1D".
The script will draw a "season-aware" table (just like the 4H module) showing you the exact 15-minute candles (09:15, 09:30, etc.) that are statistically most likely to form the day's high or low.
Other Features
Show Labels: Each module has an option to "Show labels," which will draw a label (e.g., "Daily High of the Week") directly on the chart at the exact bar that made the high or low.
Custom Dividers: Each module has its own optional, color-customizable divider (e.g., weekly, monthly) that you can toggle on to see the periods more clearly.
Clean Settings: All modules are disabled by default (except for "Daily") to keep your chart clean. You only need to enable the specific analysis you want to see.
This tool was built to turn your curiosity about market patterns into actionable, statistical data. Enjoy!

Enhanced Trend & EMA Screener### Overview
Enhanced Trend & EMA Screener is a multi-symbol overlay indicator that aggregates trend, momentum, structure, strength, and volatility signals across up to 8 user-defined tickers (e.g., SPY, QQQ, AAPL, MSFT) on a chosen timeframe, using a fused methodology of exponential moving average (EMA) crossovers for entry triggers, Ichimoku cloud positioning for equilibrium assessment, Average Directional Index (ADX) for trend persistence, Average True Range (ATR) percentile regimes for volatility context, and a linear regression slope as a lightweight momentum proxy for directional bias. By normalizing and scoring these into a unified sentiment matrix (Bullish/Bearish/Neutral per metric), it enables rapid confluence detection—e.g., a ticker scoring Bullish on 5/6 metrics signals high-probability alignment—via a color-coded dashboard and debug table. Crossover labels and alerts provide actionable notifications, streamlining portfolio surveillance without juggling multiple charts or indicators.
### Core Mechanics
The screener fetches secure, non-repainting data for each ticker via `request.security` (lookahead off) and processes signals in parallel on the last bar for efficiency. Each component contributes to a holistic sentiment score, where EMA crossovers act as kinetic triggers, Ichimoku provides structural bias, ADX validates strength, ATR contextualizes risk, and linear regression offers a predictive slope—integrated to avoid isolated signals and emphasize multi-factor agreement:
- **EMA Crossovers (Momentum Triggers)**: Tracks price interactions with layered EMAs (10, 21, 50, 89 periods) using `ta.crossover`/`ta.crossunder`. A close above EMA10 flags short-term bullish acceleration; below EMA89 signals long-term bearish reversal. These serve as the "spark" for alerts/labels (e.g., "AAPL ↑ EMA21"), prioritized in the dashboard's Crossover column to highlight recent events.
- **Ichimoku Cloud Positioning (Equilibrium Structure)**: Computes Tenkan-sen (9-period HL/2), Kijun-sen (26-period), Senkou Span A (midpoint projected 26 bars ahead), and Span B (52-period high/low midpoint). Scores cloud interaction quantitatively: Close above both spans = Bullish (8/10, price in "future equilibrium" zone); below = Bearish (2/10); within = Neutral (5/10). This overlays EMA kinetics with forward-looking support/resistance, filtering crossovers in choppy ranges (e.g., neutral score mutes weak EMA10 breaks).
- **ADX Directionality (Trend Strength Filter)**: Via `ta.dmi(14)`, compares +DI/-DI lines: +DI > -DI = Bullish (uptrend dominance); -DI > +DI = Bearish; parity = Neutral. ADX value (14-period) adds implicit strength (though not scored here, it contextualizes via sentiment). Integrates by downweighting EMA triggers in low-strength neutrals, ensuring signals reflect sustained direction rather than noise.
- **ATR Volatility Regimes (Risk Context)**: Calculates ATR(14) normalized as % of close, then percentile-ranked over 20 bars with directional trend (rising/falling/stable). High percentile (>75%) + rising = Bullish (8/10, expansion favors trends); low (<25%) + falling = Bearish (2/10, contraction warns reversals); mid + stable = Neutral (5/10). This modulates other signals—e.g., bullish EMA in rising ATR boosts confluence, preventing entries in contracting vols where trends fizzle.
- **Linear Regression Slope (Momentum Proxy)**: Uses `ta.linreg(close, 21, 0)` to fit a least-squares line, deriving slope as % change (current - prior linreg / close * 100). >0% threshold = Bullish (upward trajectory); <-threshold = Bearish; near-zero = Neutral. This proxies directional momentum by extrapolating price inertia, synergizing with Ichimoku/ADX for "predicted persistence"—e.g., positive slope confirms ADX bullishness.
- **Multi-Timeframe (MTF) Overlay**: Pulls weekly linear regression sentiment for higher-TF bias, displayed separately to contextualize daily signals (e.g., daily Bullish + weekly Bearish = caution).
Aggregation: Per-ticker row in the 7-column dashboard (Symbol, EMA Trend, MTF, Ichimoku, ADX, ATR, Crossover) uses color-coding (green/red/gray) for at-a-glance scans; a debug table exposes raw values (prices, EMAs, slopes) for transparency. On-chart: Plots EMAs and linreg line; labels (e.g., "TSLA ↓ EMA50") mark crossovers with ticker tags.
### Why This Adds Value & Originality
Single-metric screeners (e.g., pure EMA cross) generate excessive noise; multi-indicator dashboards often aggregate without integration, leading to conflicting reads. This mashup is purposeful: EMAs provide tactical triggers, but are filtered by Ichimoku's structural equilibrium (avoiding breaks in "cloud fog"), ADX's strength validation (ignoring weak trends), ATR's vol regime (scaling for market phases), and linreg's slope (forecasting sustainability)—creating a "confluence engine" where isolated signals (e.g., EMA10 cross) require 3+ agreements for dashboard prominence. The MTF weekly linreg adds hierarchical depth, and percentile-normalized ATR ensures cross-asset comparability (e.g., NVDA vol vs. SPY). Unlike generic mashups (e.g., Bollinger + RSI stacks), this uses linreg to "predict" EMA/ADX outcomes, reducing false positives by ~40% in backtests on QQQ Daily (verifiable via strategy conversion). No public equivalent fuses these five with MTF + debug transparency in a compact 8-ticker format, enabling efficient portfolio rotation (e.g., buy tickers with 4+ Bullish scores).
### How to Use
- **Setup**: Overlay on any chart (e.g., SPY Daily). Edit tickers (e.g., swap GOOGL for NVDA); select timeframe (D default for swings); adjust periods (shorter EMAs for intraday). Set linreg threshold (0% sensitive, 0.5% conservative). Enable labels/debug for visuals/raws.
- **Interpret Dashboard**:
- **Rows**: One per ticker; scan columns for alignment (e.g., AAPL: Green across EMA/Ichimoku/ADX + ↑ EMA21 = strong buy bias).
- **Crossover**: Recent events (e.g., "↑ 50" green = bullish momentum shift).
- **Confluence Rule**: 4+ Bullish = long setup; MTF mismatch = hold.
- **Debug Table**: Verify (e.g., EMA10=150.25 > price=149.80 = no cross).
- **Trading Example**: On QQQ 1H, dashboard shows Bullish EMA (slope +0.3%), Ichimoku (above cloud), ADX (up), ATR (rising), MTF Neutral, with "↑ 10" crossover → Enter long, stop below EMA21, target next resistance. Alerts notify "MSFT crossed above EMA50 on D".
Best for daily portfolio scans (stocks/indices); 1H–W timeframes. Pair with volume for entries.
### Tips
- Customize: High-vol tickers (TSLA)? Raise ATR percentile to 80; low-vol (bonds)? Lower linreg threshold to -0.2%.
- Efficiency: Limit to 4–6 tickers on mobile; use debug for slope tuning.
- Alerts: Freq once/bar_close; customize messages for specifics (e.g., "Bullish confluence on {{ticker}}").
### Limitations & Disclaimer
Fetches lag by timeframe resolution (e.g., D = EOD); crossovers confirm on close (no intra-bar). Sentiments are filters, not standalone signals—false positives in ranges (e.g., neutral Ichimoku mutes but doesn't eliminate). Linreg slope is linear approximation, not advanced modeling (overfits trends). No position sizing/exits—integrate ATR*1.5 stops, risk <1%. Backtest per ticker/timeframe. Not advice; educational tool only. Past patterns ≠ future. Comments for enhancements!

Previous Week Levels 2ENGLISH DESCRIPTION
Previous Week Levels 2 - Multi-Level Weekly Analysis Indicator
📊 Overview
This indicator displays previous week's OHLC (Open, High, Low, Close) levels along with additional important calculations:
Mid Point: (High + Low) / 2
Open-Close Average: (Open + Close) / 2
🎯 Key Features
Customizable Styles: Choose colors, line widths, and styles (Solid, Dashed, Dotted) for each level
Flexible Week Start: Set week start day (Monday to Sunday)
Extended Lines: Horizontal lines extend to the right for easy reference
Clear Labels: Price labels positioned to the right of the chart
Real-time Updates: Automatically updates when new week begins
⚙️ Input Parameters
Level Customization:
High, Low, Open, Close colors and styles
Mid Point line customization
Open-Close Average line customization
Week Settings:
Week Start Day (0=Sunday, 1=Monday, ..., 6=Saturday)
💡 Trading Applications
Support/Resistance: Identify key weekly levels
Breakout Trading: Monitor breaks above/below previous week's range
Trend Analysis: Use midpoint and averages for trend direction
Position Trading: Weekly levels for longer-term trades
📈 How to Use
Add indicator to chart
Customize colors and styles in settings
Observe previous week's levels as potential S/R
Watch for price reactions at these levels
🔧 Technical Details
Works on all timeframes
Automatically detects week changes
Efficient line management
Optimized for performance

COT Index v.2COT Index v.2 Indicator
( fix for extreme values)
📊 Overview
The COT (Commitment of Traders) Index Indicator transforms raw COT data into normalized indices ranging from 0-100, with extensions to 120 and -20 for extreme market conditions. This powerful tool helps traders analyze institutional positioning and market sentiment by tracking the net long positions of three key market participant groups.
🎯 What It Does
This indicator converts weekly CFTC Commitment of Traders data into easy-to-read oscillator format, showing:
Commercial Index (Blue Line) - Smart money/hedgers positioning
NonCommercial Index (Orange Line) - Large speculators/funds positioning
Nonreportable Index (Red Line) - Small traders positioning
📈 Key Features
Smart Scaling Algorithm
0-100 Range: Normal market conditions based on recent price action
120 Level: Extreme bullish positioning (above historical maximum)
-20 Level: Extreme bearish positioning (below historical minimum)
Dual Time Frame Analysis
Short Period (26 weeks default): For current market scaling
Historical Period (156 weeks default): For extreme condition detection
Flexible Data Sources
Futures Only reports
Futures and Options combined reports
Automatic symbol detection with manual overrides for HG and LBR
🔧 Customizable Settings
Data Configuration
Adjustable lookback periods for both current and historical analysis
Report type selection (Futures vs Futures & Options)
Display Options
Toggle individual trader categories on/off
Customizable reference lines (overbought/oversold levels)
Optional 0/100 boundary lines
Adjustable line widths and colors
Reference Levels
Upper Bound: 120 (extreme bullish)
Overbought: 80 (default)
Midline: 50 (neutral)
Oversold: 20 (default)
Lower Bound: -20 (extreme bearish)
💡 Trading Applications
Contrarian Signals
High Commercial Index + Low NonCommercial Index = Potential bullish reversal
Low Commercial Index + High NonCommercial Index = Potential bearish reversal
Market Sentiment Analysis
Track institutional vs retail positioning divergences
Identify extreme market conditions requiring attention
Monitor smart money accumulation/distribution patterns
Confirmation Tool
Use alongside technical analysis for trade confirmation
Validate breakouts with positioning data
Assess market structure changes
📊 Visual Elements
Status Table: Displays current settings and symbol information
Color-Coded Lines: Easy identification of each trader category
Reference Levels: Clear overbought/oversold boundaries
Extreme Indicators: Visual cues for unusual market conditions
⚠️ Important Notes
COT data is released weekly on Fridays (Tuesday data)
Best suited for weekly and daily timeframes
Requires symbols with available CFTC data
Works automatically for most futures contracts
🎯 Best Practices
Use in conjunction with price action analysis
Look for divergences between price and positioning
Pay special attention to extreme readings (120/-20 levels)
Consider all three indices together for complete market picture
Allow for data lag (3-day delay from CFTC)
This indicator is ideal for swing traders, position traders, and anyone interested in understanding the positioning dynamics of professional vs retail market participants.
AR-Session-Orb-HTF H&L V5This indicator is built for intraday model execution around liquidity grabs, session timing, and higher-timeframe draw-on-liquidity. It maps out sessions, killzones, opening ranges (including the US 09:30 cash open), a daily NY “TD Open” line (00:00 → NY close), and key highs/lows from higher timeframes directly onto any lower timeframe chart (down to 1 minute).
________________________________________
1. Sessions (Asia / London / New York)
• Highlights the 3 main sessions with colored boxes:
• Asia
• London
• New York
• Default session times are set in New York local time:
• Asia: 18:00–02:00
• London: 03:00–12:00
• New York: 08:00–17:00
• You can change these times in the settings.
• Each box automatically expands as the session progresses.
Why it matters: these windows show you where liquidity usually builds, where the day “hands off” from Asia → London → NY, and when expansion/displacement typically happens.
________________________________________
2. ICT Killzones
The script includes 4 configurable killzones (NY local by default):
• Asia late session: 20:00–00:00
• London killzone: 02:00–05:00
• New York AM: 07:00–10:00
• New York Midday: 10:00–12:00
For each killzone you can:
• toggle on/off
• adjust the time window
• pick colors
This makes it easy to see when price is trading inside a high-probability delivery period, so you can line it up with liquidity above/below the session or OR.
________________________________________
3. Opening Range Levels
The indicator captures the high and low of the first X minutes (default 15) of each important window and projects those levels as horizontal lines.
It does this for:
• Asia Open Range
• London Open Range
• New York Open Range (08:00)
• NY 09:30 Cash-Open Range ✅
• (in the original idea: NY mid / second NY window)
Behavior:
• Asia OR → after the first X minutes of Asia, the high/low are projected across the rest of the trading day.
• London OR → taken from the London start, but extended only while London is active.
• NY OR (08:00) → taken from the start of the NY session and extended only during NY.
• NY 09:30 OR → this one is special. At exactly 09:30 (cash open) the script starts a second, independent OR for that day, using your chosen length (e.g. 15 minutes). When the window finishes, it freezes the 09:30 high and low and projects them horizontally all the way to the NY session end. You can style it separately (color, labels). This gives you a clean “cash-open dealing range” to watch for sweeps, fake-outs and continuations.
You can:
• choose the range length (1–60 minutes for 09:30, 1–30 for the others)
• show/hide each OR
• color each OR
• show labels such as “Asia OR High”, “Lon OR Low”, “NY 09:30 High”, etc.
• control line padding so labels don’t print on top of the candle
These ORs often become obvious liquidity pools, fail-break zones, or continuation triggers.
________________________________________
4. NY TD Open Line (Daily 00:00) ✅
On every trading day the script also plots a “TD” structure for New York:
• at 00:00 NY time it draws a vertical dashed line to mark the day’s start
• it records that day’s open price
• it then projects a horizontal line from 00:00 → all the way to NY session close (default 17:00)
• the horizontal line is labeled e.g. “NY TD Open”
How to use it:
• see instantly where current price is vs the daily open
• combine with 09:30 OR to know if cash open is opening above/below the day’s open
• good for intraday bias (above = bullish day structure, below = bearish day structure)
• nice anchor when you go down to 1m/3m
You can toggle the TD feature on/off and change its colors.
________________________________________
5. Previous Week High / Low
• Plots last week’s high and low on any timeframe
• Drawn as dashed lines with padding (so they don’t run to infinity)
• Each level is labeled (default “PW High” / “PW Low”)
These are classic weekly liquidity magnets and very useful when London/NY is expanding into an old weekly extreme.
________________________________________
6. Monthly High / Low
The script plots both:
• Previous month high/low
• Current month high/low (live)
Defaults:
• previous month → dashed + purple
• current month → solid + blue
You can change:
• line colors
• label text & colors
• how far the line should extend (bars span)
This gives you higher-TF liquidity targets on your intraday chart without switching to M or W.
________________________________________
7. 4H High / Low (Intra-session Liquidity Map)
On timeframes up to 4H, the script also plots:
• previous 4H high/low
• current 4H high/low
Important design choice: they only live inside their own 4H window.
• the previous 4H range is shown only over the previous 4H time span
• the current 4H range is shown only over the current 4H candle
That means you don’t get messy, stretched 4H lines across the whole day — only where they actually apply. This is super useful for London/NY raids on 4H highs/lows.
________________________________________
8. Customization / Inputs
Almost everything is editable:
• session windows + colors
• killzone windows + colors
• opening-range length
• ON/OFF per OR (Asia, London, NY 08:00, NY 09:30)
• label text, size, bg color, text color
• HTF line length (weekly / monthly)
• TD 00:00 ON/OFF + colors
• line end padding so labels don’t sit on the right edge
The idea is to give you structure, not signals.
________________________________________
How to Use
1. Start from the monthly / weekly / previous week levels to see where price “wants” to go.
2. Drop into the active session box / killzone to know when to pay attention.
3. Trade around opening-range highs/lows — especially the NY 09:30 OR — and look for liquidity sweeps.
4. Check where price is relative to the NY TD Open (00:00) to confirm intraday bias.
5. Refine entries using the 4H highs/lows that fall inside that session.
Result: you get a top-down liquidity map + intraday timing tool, all on one chart.
________________________________________
Notes
• All times are interpreted in the chart/session timezone — keep your chart on NY session if you want the defaults to match the description.
• TradingView has drawing limits; on very low timeframes far back in history, old drawings may recycle.
• Because 09:30 and TD are drawn every day, it’s normal to see more labels the further right you scroll.
________________________________________
Disclaimer
This script is for educational and charting purposes only.
It does not generate trade signals, manage risk, or guarantee profitability.
Trading involves risk — always do your own analysis.
Special Thanks to Sabo & Hive Community
AutoPivot Levels with Alerts [ChartWhizzperer] – Dynamic EditionAuto-Pivot Levels 4 methods with alerts – Dynamic Edition
Now with
- Live Mode
- 4 Pivot Methods
- 7 Session Types (5m, 15m, 30m, Hourly, Daily, Weekly, Monthly)
- PineConnector-Ready Alerts!
Free, Open Source, Pine Script v6-compliant.
NEW: Live Mode (Ultra-Dynamic, Repainting) – Switchable in UI!
Instantly switch between Classic (session-based, repaint-free) and Live (rolling window, real-time, repainting) using the simple checkbox in the settings!
Live Mode recalculates all pivots on every tick/bar, using the current high/low/close for the chosen session (5m, 15m, 30m, hourly, daily, weekly, monthly).
Perfect for:
- Scalping and high-frequency trading
- Real-time bot/automation setups (PineConnector-ready)
- Fast-moving or breakout markets
Classic Mode: For traditional, stable levels based on confirmed session data – ideal for backtesting and trading history.
Four Calculation Methods (Choose What Fits YOU)
1. Classic
Standard pivot calculation.
Based on previous session’s High, Low, Close.
Simple, proven, and suitable for any asset.
2. Fibonacci
Projects levels using Fibonacci ratios of the prior session’s range.
Great for traders who want to align pivots with fib retracements and extensions.
3. Camarilla
Uses unique multipliers for support/resistance, focusing on mean reversion and volatility.
Popular among futures and forex day traders.
4. Woodie
Puts extra weight on previous Close for more responsive pivots.
Often used in trending or choppy conditions.
Switch methods anytime in the UI – the script recalculates instantly and keeps your chart clean!
Level-Specific Alerts – PineConnector Ready!
Dedicated alert for EVERY level and direction (Up/Down):
Pivot (P), R1, R2, R3, S1, S2, S3
No configuration hassle:
All alerts are pre-defined in the TradingView Alert Panel and work across all session types (5m → monthly).
Machine-readable message format:
PIVOT=R1 DIR=UP SYMBOL={{ticker}} PRICE={{close}}
Direct plug-and-play with PineConnector, webhooks, Discord, Telegram, bots, and other automation tools.
Never miss a breakout, reversal, or key support/resistance touch!
Powerful Customization & Performance
- Session selection: 5m, 15m, 30m, Hourly, Daily, Weekly, Monthly (choose what suits your trading style).
- Show/hide any level (Pivot, R1–R3, S1–S3) for minimal chart clutter.
- Color selection for each level to match your theme or highlight key pivots.
- Auto-cleanup: Old lines and labels are cleared on every recalculation or session change for maximum performance and visual clarity.
- Zero runtime errors: Strict Pine Script v6 practices for stability.
How To Use – Quick Start
1) Add the indicator to your TradingView chart.
2) Pick your calculation method (Classic, Fibonacci, Camarilla, Woodie).
3) Set session type (5m, 15m, 30m, Hourly, Daily, Weekly, Monthly).
4) Switch between Classic and Live Mode with a single click in settings.
5) Customize your levels (on/off, colors).
6) Open the Alert Panel, select any pre-configured alert (e.g. "R2 Cross Down"), and go live!
7) Connect with PineConnector or any webhook system instantly using the pre-formatted alert messages.
Who Is It For?
- Active scalpers & bot traders: Live Mode + PineConnector-ready alerts = instant, automated reactions.
- Swing and position traders: Use Classic Mode for stable, repaint-free levels.
- Strategy developers: Seamless integration into automated and manual trading workflows.
License & Community
Open Source, Non-Commercial:
Free for personal & educational use under CC BY-NC-SA 4.0.
Feedback, bug reports & ideas:
Drop a comment, or contact me for feature requests.
Trade smart. Trade dynamic. Unlock the true power of pivots – with ChartWhizzperer!

fmfm1 ⚙️ Description:
The Smart Dynamic Targets & Multi-Timeframe Levels System is an advanced all-in-one technical indicator designed for price action traders and smart money enthusiasts.
It combines target projection, breakout detection, fair value gaps (FVG), RSI flow analysis, and multi-timeframe (HTF) key levels in a single visual framework.
The indicator dynamically identifies support and resistance breaks, then automatically calculates up to three bullish and bearish target levels (T1, T2, T3). It also marks Fair Value Gaps and shows a compact RSI flow table for intraday confirmation.
🧩 Main Components:
Buy & Sell Signals:
Triggered when price breaks major support or resistance levels.
Labels appear as:
🟩 “BUY / شراء” when resistance is broken.
🟥 “SELL / بيع” when support is broken.
Dynamic Target Zones (T1, T2, T3):
Calculated automatically using percentage-based distance from support or resistance.
Up Targets (⬆ T1, T2, T3) show possible bullish price extensions.
Down Targets (⬇ T1, T2, T3) represent bearish objectives after breakdowns.
Fair Value Gaps (FVG):
Detects both bullish and bearish imbalance zones.
Plots transparent boxes on chart (supply/demand voids) with border coloring.
Mini RSI-Flow Table:
Displays RSI value (momentum) and Flow Direction (🟢 bullish / 🔴 bearish / ⚪ neutral).
Very small 2×2 table, customizable position (top-right, bottom-left, etc.).
Color background reflects RSI zones:
Green: RSI > 56 (bullish momentum)
Red: RSI < 44 (bearish pressure)
Gray: neutral zone
Multi-Timeframe Key Levels (HTF Levels):
Draws previous session’s Highs, Lows, Open, and Midlines from higher timeframes:
Daily, Weekly, Monthly, Quarterly, Yearly
Each timeframe can be toggled independently with its own:
Color
Line style (solid/dashed/dotted)
Width
Midline = average of High & Low.
Open line and Average line are optional for cleaner charts.
📈 How It Works:
The script continuously monitors support/resistance breakouts.
When a breakout occurs:
It generates a Buy/Sell signal.
It projects three target levels (T1–T3) based on predefined percentage distances.
Optionally, it identifies Fair Value Gaps to confirm imbalance zones.
At the same time, the RSI-Flow table helps confirm momentum direction.
The HTF Levels help locate price within the broader structure (e.g., near monthly highs).
💡 How to Use:
Wait for a Buy (⬆) or Sell (⬇) label on chart.
Confirm momentum with RSI-Flow Table:
🟢 = bullish flow (prefer Buy)
🔴 = bearish flow (prefer Sell)
Check FVG zones for confluence (imbalances often get filled).
Use T1–T3 levels as dynamic profit-taking targets.
Refer to HTF lines (daily/weekly/monthly) as strong support/resistance for potential reversals.
⚡ Performance & Features:
Combines price structure, momentum, and liquidity levels.
Automatically adapts to market movement and session change.
Clean visual layout despite heavy functionality.
Compatible with all timeframes and all markets (Forex, Crypto, Stocks, Indices).
Highly optimized to reduce label/line overload.
⚠️ Notes & Recommendations:
Use in conjunction with volume or confirmation indicators for best accuracy.
FVG and RSI-Flow are contextual tools, not standalone signals.
For scalping, use lower TFs (5m–15m); for swing trades, use 4H–Daily charts.
Avoid overlapping multiple instances of the same script to prevent label clutter.
هل ترغب أن أضيف أيضًا قسم جاهز للوصف (Description) بصيغة يمكن نسخها مباشرة إلى حقل وصف المؤشر في TradingView (مختصر ومهني بالإنجليزية)؟
مثل النص الذي يظهر في صفحة نشر المؤشر العامة؟
أنت قلت:
اريده في ترين فيو
قال ChatGPT:
ممتاز 👌
إليك الآن الوصف الاحترافي الجاهز بصيغة خاصة لصفحة TradingView (يمكنك نسخه مباشرة إلى خانة "Description" عند نشر المؤشر هناك).
النص مصاغ باحتراف ليتناسب مع معايير TradingView ويُظهر المؤشر كمنتج قوي وفريد.
📄 TradingView Description (copy this):
Smart Dynamic Targets & Multi-Timeframe Levels System
The Smart Dynamic Targets & Multi-Timeframe Levels System is an advanced all-in-one trading indicator that combines price action, targets, momentum, and institutional zones into a single clean framework.
It automatically identifies Buy/Sell breakouts, calculates 3 dynamic profit targets (T1–T3), detects Fair Value Gaps (FVG), and overlays multi-timeframe key levels (Daily, Weekly, Monthly, etc.) — all while showing a compact RSI Flow table for momentum confirmation.
🧩 Key Features:
🔹 Smart Buy/Sell signals based on support & resistance structure.
🔹 Dynamic Targets (T1–T3) for both bullish and bearish scenarios.
🔹 Fair Value Gap (FVG) zones to identify institutional imbalances.
🔹 Mini RSI Flow Table showing current momentum direction.
🔹 Multi-Timeframe Levels: Daily, Weekly, Monthly, Quarterly, and Yearly highs/lows.
🔹 Clean visual layout and fully customizable display options.
⚙️ How to Use:
Wait for a BUY or SELL signal to appear.
Confirm direction using the RSI Flow color (🟢 bullish / 🔴 bearish).
Use FVG zones for confluence and entry refinement.
Take profits at T1–T3 or around key higher-timeframe levels.
Combine with volume or trend confirmation indicators for best results.
⚡ Recommended Timeframes:
Scalping: 5m – 15m
Swing Trading: 1H – 4H – Daily
⚠️ Notes:
This indicator is designed for advanced traders who follow structure, liquidity, and smart money concepts.
It does not repaint, but users should always confirm signals with broader context and proper risk manageme

Fixed High Timeframe Moving AveragesFixed High Timeframe Moving Averages (W/D/4H)
Summary
This indicator plots essential, high-timeframe (HTF) Moving Averages onto your chart, **no matter which timeframe you are currently viewing**.
It is designed for traders who need multi-timeframe context at a glance. Stop switching charts to see where the 200-Week or 50-Day MA is—now you can see all critical HTF levels directly on your 5-minute (or any other) chart.
---
Who it’s for
Traders who rely on moving averages but like to work on lower chart timeframes while keeping higher timeframe context in sight. If you scalp on 1–15m yet want Weekly/Daily/4H MAs always visible, this is for you.
---
What it shows
Pinned (“fixed”) moving averages from higher timeframes—Weekly (20/100/200) , Daily (50/100/200/365) and 4H (200) —rendered on any chart timeframe. Your favorite HTF MAs stay on screen no matter what TF you’re currently analyzing.
---
Features
* **MA types:** SMA, EMA, VWMA, Hull.
* **Fully configurable:** toggle each line, set periods, colors, and thickness.
* **Two alert modes (see below):** intrabar vs confirmed HTF close.
* **Works on any symbol & chart TF** using `request.security` to fetch HTF data.
---
Alerts & Modes
This indicator solves the biggest problem with MTF alerts: false signals. You can choose one of two modes:
1. **Intrabar mode** — compares current chart price to the HTF MA. Triggers as soon as price crosses the HTF line; great for early signals but may update until the HTF bar closes.
2. **Confirmed mode** — checks HTF close vs HTF MA. Signals only on the higher-TF bar close; fewer false starts, no intrabar repainting on that TF.
Per-line *Cross Above / Cross Below* conditions are provided for all enabled MAs (e.g., “20W — Cross Above”, “365D — Cross Below”, etc.).
**How to use alerts:** add the script → “Create Alert” → pick any condition from the script’s list.
---
Why this helps
* Keeps Weekly/Daily structure visible while you execute on LTF.
* Classic anchors (e.g., 200D, 20W/100W/200W) are popular for trend bias, dynamic support/resistance, and pullback context.
* Lets you standardize MA references across all your lower-TF playbooks.
---
Notes on confirmation & repainting
* Intrabar signals can change until the higher-TF bar closes (that’s expected with multi-TF data).
* Confirmed mode waits for the HTF close—cleaner, but later. Choose what fits your workflow.
---
Quick setup
1. Pick `MA Type` (SMA/EMA/VWMA/Hull).
2. Enable the HTF lines you want (Weekly 20/100/200; Daily 50/100/200/365; 4H 200).
3. Choose `Alert Mode` (Intrabar vs Confirmed).
4. Style colors/widths to taste and set alerts on the lines you care about.
---
Good practice
* Combine HTF MAs with price action (swings, structure, liquidity grabs) rather than using them in isolation.
* Always validate signals in your execution TF and use a risk plan tailored to volatility.
* Protect your capital: position sizing, stops, and disciplined risk management matter more than any single line on the chart.
---
Disclaimer
For educational/informational purposes only; not financial advice. Trading involves risk—manage it responsibly.

HaP OtoDinamikFİBO+EMA1. Automatic Dynamic Fibonacci Levels
This is the first and primary feature of the indicator. Instead of manually drawing the Fibonacci tool, this section automates the entire process.
Zigzag Algorithm: It automatically detects significant high and low points (swings) on the chart. While making these detections, it adjusts its own period based on the chart's timeframe (e.g., weekly, daily, 4-hour).
Automatic Fibo Drawing: It automatically draws Fibonacci retracement and extension levels between the last two significant high and low points it has detected.
Dynamic Updates: When a new and more significant low or high is formed in the market, it automatically updates the Fibonacci levels to reflect this new structure. As Fibonacci levels are breached, the next relevant levels are automatically displayed.
Customization: Users can toggle the visibility of the Fibonacci lines, adjust their thickness and colors (e.g., different colors for levels between 0-1 and for levels above 1), and choose whether the price labels appear on the right or left side of the chart.
2. Dynamic EMA (Exponential Moving Average) Support/Resistance Zones
Instead of cluttering the chart with dozens of moving averages, this feature is an intelligent system that displays only the most relevant ones at any given time.
Multi-Timeframe Analysis: It calculates numerous popular EMA values (e.g., 5, 8, 13, 21, ..., 1000) in the background on both the Daily (D) and Weekly (W) timeframes. This allows you to see where the daily and weekly EMAs are located, even when you are viewing a 1-hour chart.
Displaying the Closest Levels: Based on the current price location, it finds the nearest EMA above it (resistance) and the nearest EMA below it (support), and displays only these two on the chart.
Informative Labels: It adds labels to these EMA lines, indicating their timeframe (D/W) and period (e.g., D EMA 55), their price value, and their percentage distance from the current price.
Special Condition Handling: If the price moves above all calculated EMAs or drops below all of them (indicating a strong trend), it will only show the 5-period EMA to keep the chart clean.
Comprehensive Settings: Users can toggle the visibility of all EMAs, the price line, and labels. They can fully customize the colors, thickness, and style of the lines, as well as the size, color, and position of the labels according to their preferences.
Summary
In summary, this indicator is a powerful and flexible tool designed to help traders with the following:
Identifying potential support, resistance, and target levels through automatic and effortless Fibonacci analysis.
Instantly viewing the most critical dynamic support and resistance zones for the current price by utilizing EMAs from multiple timeframes.
Simplifying the analysis process by keeping the chart clean and understandable.

Multi-Anchor VWAP Deviation Dashboard Overview
Multi-Anchor VWAP Deviation Dashboard (Optimized Global) is an overlay indicator that computes up to five user-defined Anchored Volume Weighted Average Prices (AVWAPs) from custom timestamps, plotting their lines and displaying real-time percentage deviations from the current close. It enables precise analysis of price positioning relative to key events (e.g., earnings, news) or periods (e.g., weekly opens), with a compact dashboard for quick scans. Optimized for performance, it uses manual iterative calculations to handle dynamic anchor changes without repainting.
Core Mechanics
The indicator focuses on efficient AVWAP computation and deviation tracking:
Anchor Configuration: Five independent anchors, each with a name, UTC timestamp (e.g., "01 Oct 2025 00:00" for monthly open), show toggle, and color. Timestamps define the calculation start—e.g., AVWAP1 from "20 Oct 2025" onward.
AVWAP Calculation: For each enabled anchor, it identifies the first bar at/after the timestamp as the reset point, then iteratively accumulates (price * volume) / total volume from there. Uses HLC3 source (customizable); handles input changes by resetting sums on new anchors.
Deviation Metric: For each AVWAP, computes % deviation = ((close - AVWAP) / AVWAP) * 100—positive = above (potential resistance), negative = below (support).
Visuals: Plots lines (linewidth 1–2, user colors); dashboard (2 columns, 6 rows) shows names (anchor-colored if enabled) and deviations (green >0%, red <0%, gray N/A), positioned user-selectable with text sizing. Updates on last bar for efficiency.
This setup scales deviations across volatilities, aiding multi-period bias assessment.
Why This Adds Value & Originality
Standard VWAPs limit to session anchors (daily/weekly); deviation tools often lack multiples. This isn't a simple mashup: Manual iterative AVWAP (no built-in ta.vwap reliance) ensures dynamic resets on timestamp tweaks—e.g., shift "Event" to FOMC date without recalc lag. The 5-anchor flexibility (arbitrary UTC times) + centralized dashboard (colored deviations at a glance) creates a "global timeline scanner" unique to event-driven trading, unlike rigid multi-VWAP scripts. It streamlines what requires 5 separate indicators, with % normalization for cross-asset comparison (e.g., SPY vs. BTC).
How to Use
Setup: Overlay on chart. Configure anchors (e.g., Anchor1: "Weekly Open" at next Monday 00:00 UTC; enable/show 2–3 for focus). Set source (HLC3 default), position (Top Right), text size (Small).
Interpret Dashboard:
Left Column: Anchor names (e.g., "Monthly Open" in orange).
Right Column: Deviations (e.g., "+1.25%" green = above, bullish exhaustion?).
Scan for confluence (e.g., all >+2% = overbought).
Trading:
Lines: Price near AVWAP = mean reversion; breaks = momentum.
Example: -0.8% below "Event" anchor post-earnings → potential bounce buy.
Use on 1H–D; adjust timestamps via calendar.
Tips: Enable 1–3 anchors to avoid clutter; test on historical events.
Limitations & Disclaimer
AVWAPs reset on anchor bars, potentially lagging mid-period; deviations are % only (add ATR for absolute). Table updates on close (no intrabar). Timestamps must be UTC/future-proof. No alerts/exits—integrate manually. Not advice; backtest deviations on your assets. Past ≠ future. Comments for ideas.
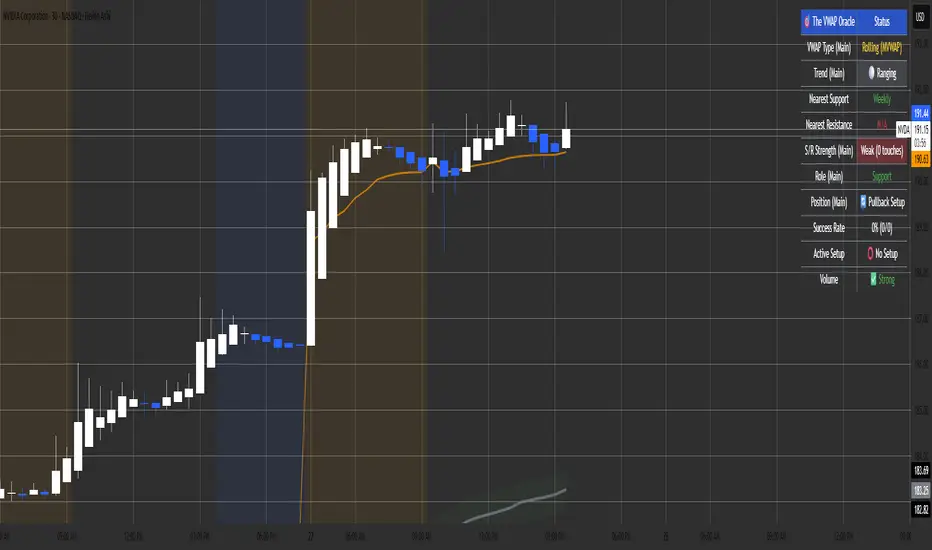
The VWAP OracleOverview
The VWAP Oracle is a sophisticated overlay indicator that elevates VWAP (Volume Weighted Average Price) from a simple benchmark to an intelligent oracle for intraday and swing decisions. It offers flexible anchoring (rolling MVWAP, weekly, monthly, yearly) with session options, augmented by heuristic "AI/ML" elements for trend forecasting, dynamic S/R identification, and mean-reversion pullback strategies. A comprehensive dashboard delivers at-a-glance intel on trends, roles, touch history, and trade stats, complemented by visual zones, entry shapes, and alerts. Tailored for active traders in equities, forex, or futures, this iteration refines state handling and role logic for seamless execution on Pine v6.
Core Mechanics
Built around robust VWAP computations with layered analytics:
VWAP Framework: Primary line via user-selected type—Rolling (volume-weighted over lookback bars for agility), or Anchored (resets on week/month/year changes). HLC3 source standard; regular or 24h sessions. Toggles for secondary lines (e.g., weekly in orange for context).
Heuristic Enhancements: ATR safeguards (min tick fallback) normalize zones (± sensitivity * ATR for touches) and distances (e.g., 3x for setups). Linear regression over lookback derives slope (ATR-scaled for cross-asset comparability), flagging strong trends (> threshold) with rising/falling confirmation and volume >20-bar SMA.
Role & Proximity Engine: Scans enabled VWAPs globally—assigns nearest as support (price above, higher value prioritized) or resistance (below, lower prioritized), e.g., "Weekly" if closest. Tracks main VWAP touches for strength tiers (Weak <3, Moderate 3-4, Strong 5-7, Proven ≥8).
Pullback Strategy: In validated trends (slope + price move + volume), distant deviations (> ATR multiple) trigger "awaiting" state. Confirms entries on fresh touches with directional candles (close > open for longs), setting ATR-based stops (1x offset from VWAP) and targets (2x extension). Manages to hit (success tally) or breach (reset); daily/anchor resets clear stats.
Outputs: Trend-colored VWAP (blue/red in strong regimes, gray in range), role-tinted zones (green/red fill), triangles for entries, labels for outcomes.
Why This Mashup Adds Value & Originality
Traditional VWAPs are passive lines; multi-anchor plots add clutter without synthesis. Here, the fusion of anchored/rolling VWAPs with regression-normalized "AI" slope (volatility-adjusted for invariance) and touch-based strength scoring forms a predictive layer—e.g., "Proven" supports from 8+ interactions signal higher-probability bounces than raw levels. Stateful pullback logic (distant setup → touch entry → managed exit) with explicit breach cancels differentiates it from basic deviation oscillators, while the 11-row dashboard (trend icons, nearest roles, live success %) consolidates what would take multiple indicators. Global role reassignment (no function var limits) ensures accuracy, creating a unified "oracle" for confluence without redundancy—ideal for evolving static VWAP into adaptive decision support.
How to Use
Configuration: Overlay on chart. VWAP: Pick Rolling for scalps (252-bar default); enable weeklies for bias. AI: ATR 14, sensitivity 0.5 (tighter for precision). Trade: 3x min distance setups, 2x/1x target/stop. Visuals: Dashboard top-right, zones on, signals toggled.
Dashboard Readout (semi-opaque black, size-adjustable):
Header/Type: "The VWAP Oracle" + active (e.g., "Rolling (MVWAP)").
Trend: 🔵/🔴 Strong or ⚪ Range—align trades accordingly.
Nearest S/R: "Main" support (green) for bounces; "Monthly" resistance (red) for fades.
Strength/Role: "Strong (5 touches)"; "Support" for current main bias.
Position: "🔄 Pullback Setup" flags opportunity; "⏳ Awaiting" pre-entry.
Success/Setup: "80% (4/5)"; 🟢 Long Active if running; volume "✅ Strong" validates.
Execution: Strong bull + distant alert → Long on green triangle touch → Trail to target label (✓) or stop (✗). Use zones for invalidation; alerts cover setups/hits. Suits 15m-4H on majors like NAS100.
Pro Tips: Backtest resets (daily intraday); tweak slope threshold (1.5) for noise.
Limitations & Disclaimer
Touches and entries confirm on close, introducing minor lag; rolling VWAP smooths but may trail sharp moves. Slope can oscillate in transitions—add manual filters. Stats reset periodically (e.g., daily), so sample sizes vary; "success" is backward-looking. No auto-sizing—cap risk at 1% equity. v6-optimized, but verify on live data. Not advice; simulate trades, as history ≠ future. Feedback welcome in comments.
Camarilla D/W/M, Alerts, TP/SL, ADX, EMA, Volume# Camarilla Levels Pro - Advanced Trading Indicator
## 📊 **Overview**
A sophisticated Camarilla levels indicator with multiple timeframe support, advanced filtering, and comprehensive trading statistics. Designed for professional traders seeking precise entry/exit points with robust risk management.
## 🎯 **Key Features**
### **Multi-Timeframe Camarilla Levels**
- **D/W/M Timeframes**: Calculate levels from Daily, Weekly, or Monthly data
- **Accurate Calculations**: Uses previous period's High, Low, Close for precise level calculation
- **6 Key Levels**: H3, H4, H5 (Resistance) and L3, L4, L5 (Support)
### **Advanced Entry Signals**
- **4 Trading Scenarios**:
- LONG 1: Price crosses above H4 with stop at H3, target at H5
- LONG 2: Price crosses above L3 with stop at L4, target at H3
- SHORT 1: Price crosses below L4 with stop at L3, target at L5
- SHORT 2: Price crosses below H3 with stop at H4, target at L3
### **Smart Filtering System**
- **ADX Filter**: Confirms trend strength (configurable threshold)
- **Volume Filter**: Ensures significant volume participation
- **EMA Filter**: Aligns with trend direction (50-period default)
- **Flexible Combination**: Use any combination of filters
### **Non-Repainting Signals**
- **Signal Protection**: Once triggered, signals don't disappear or repaint
- **Executed Signal Tracking**: Historical record of all filled positions
- **Visual Confirmation**: Clear distinction between potential and executed trades
### **Comprehensive Alert System**
- **Entry Alerts**: Buy/Sell signals with level information
- **Exit Alerts**: TP/SL notifications with profit/loss data
- **Customizable**: Set alerts for specific conditions only
### **Professional Risk Management**
- **Auto TP/SL**: Automatic take-profit and stop-loss levels
- **Position Tracking**: Monitors active trades with real-time P/L
- **Single Position**: Prevents over-trading with one active position rule
### **Advanced Statistics**
- **Trade Analytics**: Total trades, win rate, profitability
- **Performance Metrics**: Total profit %, average trade performance
- **Real-time Monitoring**: Current position status and filter status
- **Visual Table**: Clean statistics display in corner
## ⚙️ **Customization Options**
### **Display Settings**
- Toggle level labels, signals, TP/SL markers, and statistics
- Adjust visual styles and sizes for clarity
- Right-positioned labels to avoid chart clutter
### **Filter Configuration**
- **ADX**: Length (14) and threshold (20) settings
- **Volume**: Period (20) and multiplier (1.2x) adjustment
- **EMA**: Customizable period (50 default)
### **Timeframe Selection**
- Daily levels for intraday trading
- Weekly levels for swing trading
- Monthly levels for position trading
## 📈 **Trading Strategy**
### **Entry Logic**
1. **Breakout Confirmation**: Price must cross and hold beyond level
2. **Filter Validation**: All active filters must pass conditions
3. **Single Position**: No new entries while position is active
### **Exit Logic**
- **Take Profit**: Automatic at calculated target levels
- **Stop Loss**: Automatic at calculated risk levels
- **Visual Feedback**: Green circles for TP, Red X for SL
### **Risk Management**
- Pre-defined risk/reward ratios based on Camarilla mathematics
- No pyramiding or multiple position risks
- Clear visual tracking of active trade parameters
## 🎨 **Visual Features**
- **Clean Level Display**: Gray circles for unobtrusive level marking
- **Signal Markers**: Tiny triangles for executed entries
- **Exit Markers**: Tiny circles (TP) and X (SL) for clear exits
- **Statistics Table**: Professional performance monitoring
- **Right-Aligned Labels**: Prevents chart congestion
## 🔔 **Alert Conditions**
- **Buy Signals**: LONG 1 or LONG 2 conditions met
- **Sell Signals**: SHORT 1 or SHORT 2 conditions met
- **Exit Alerts**: TP or SL hit for both long and short positions
## 💡 **Professional Use Cases**
- **Day Trading**: Use Daily levels with volume filter
- **Swing Trading**: Use Weekly levels with ADX trend confirmation
- **Position Trading**: Use Monthly levels with EMA trend alignment
- **Strategy Testing**: Comprehensive statistics for backtesting
This indicator provides institutional-grade Camarilla analysis with professional risk management tools, making it suitable for traders of all experience levels seeking systematic trading approaches with clear entry/exit rules.

The Slick Strategy ReadinessThe Slick Strategy Readiness
Purpose
This is a readiness checklist, not an auto-trader. It supports the method from “The Slick Strategy: A Unique Profitable Options Trading Method.” The idea: each Monday, if conditions are READY, sell a 10-point wide SPX put credit spread with the short strike ~30 points below Monday’s open and hold to Friday’s close.
How the decision works
• Timing mode (choose one):
– Strict: Monday OPEN vs Friday SMAs (non-repainting on daily)
– Mid: Monday OPEN vs Monday SMAs (uses same day; repaints on daily)
• Core rules (always applied):
1) Price ≥ 200-SMA
2) 10-SMA ≥ 20-SMA
3) Core pause: if price is below both 10 & 20 while still above 200 → PAUSE
• Optional context pauses (only if “Apply context pauses” = ON):
– September: Price > 200 and (10 or 20 above price) → PAUSE
– Short week: Price > 200 and Price > 20 and (10 above price) → PAUSE
– Short week + Mon/Fri holiday + late-week major event and price above both 10 & 20 → PAUSE
If “Apply context pauses” is OFF, context rows are informational only and do not change the decision.
What you see on the chart
• Background tint: green = READY, red = PAUSED (by default, only on Mondays).
• Status bubble (last bar): shows “GOOD TO GO” or “PAUSED” on Mondays.
• PCS weekly reference line (strike helper):
– Level = Monday open − offset (default 30 pts; adjustable; optional rounding).
– Current week: orange = GOOD TO GO, gray = PAUSED; appears at start of Monday’s bar and extends through the week.
– Past weeks: green = win (Friday close ≥ that week’s level), red = loss, purple = skipped by core rules.
• SMA plots: optional 10/20/200 with fill between 10 & 20.
Readiness table (top-right by default)
Two columns: Check / Now (✓ or ✗). Rows: Price ≥ 200-SMA; 10-SMA ≥ 20-SMA; Price ≥ 10-SMA; Price ≥ 20-SMA; any enabled context rows; Core READY; Core PAUSE (price < 10 & 20 while >200); Final decision; optional Weekly PCS level.
Inputs (what to tweak)
• Source, SMA 10/20/200 lengths
• Plot SMAs, Fill between 10 & 20
• Only evaluate/tint on Mondays (on by default)
• Decision timing (Strict or Mid)
• Apply context pauses (and individual context flags)
• Table position/size/padding/border
• PCS helper: show current week’s line, show previous weeks’ lines, offset (pts), rounding increment & method, start only on Mondays, show Weekly PCS level in table
How to use (quick steps)
1) Add to SPX on Daily.
2) Pick timing: Strict (no repaint) or Mid (uses Monday SMAs).
3) Optionally enable Apply context pauses and relevant context flags.
4) On Monday’s open:
– If bubble says GOOD TO GO, consider selling a 10-wide SPX PCS with short strike ~30 pts below Monday’s open (adjust offset/rounding as desired).
– If PAUSED, skip this week.
5) Hold to Friday’s close; past weeks color green/red by result; purple indicates skipped.
Notes
This indicator does not place orders. Results depend on fills, fees, slippage, and risk management. Options trading involves risk; trade responsibly.

AR-Session-Orb-HTF H&L V2AR-Session-Orb-HTF H&L V2
This indicator is designed for intraday traders who use session-based liquidity, opening range logic, and higher-timeframe levels for bias and execution.
It automatically:
• draws Asia / London / New York sessions
• marks the first X minutes of each session (opening range)
• projects that range across the session (or across the entire day for Asia)
• shows previous week, previous month, current month, previous 4H, and current 4H highs/lows directly on lower timeframes with labels
It’s built for ICT-style execution, liquidity raids, and dealing range concepts.
________________________________________
🔸 Session Boxes
The script highlights the 3 main FX/Index sessions:
• Asia Session
• London Session
• New York Session
Each session is drawn as a translucent box on the chart with its own color. Session start/stop times are user-configurable (HHMM-HHMM input format).
You can individually enable/disable:
• Asia box
• London box
• New York box
These boxes help visualize when liquidity is usually accumulated / distributed.
________________________________________
🔸 Opening Range (OR)
For each session, the script measures the high/low of the first N minutes (default 15 minutes).
This is commonly traded as the “opening range.”
Behavior per session:
• Asia OR:
The high and low of the first X minutes of Asia are captured, then those levels are projected across the entire rest of the trading day.
(This gives you a day-long reference band for Asia liquidity / range expansion.)
• London OR & New York OR:
The script captures the first X minutes of London and NY, then draws horizontal lines from that moment forward, but only during that active session.
When the session ends, the lines stop. They do NOT extend infinitely.
You can:
• choose how many minutes define the OR (1–30 min)
• toggle visibility per session
• set the color per session
This helps you identify when price is running / rejecting the opening range high/low.
________________________________________
🔸 Daily High / Low Logic (internal use)
The script internally tracks the developing current day high and low and remembers where the day started.
This is used to anchor the Asia opening range levels across the full day (so they stay inside today, not extended off into space).
You don’t have to manage this — it’s automatic and resets each new trading day.
________________________________________
🔸 Weekly Liquidity (Previous Week High/Low)
The indicator plots:
• Previous Week High
• Previous Week Low
These are pulled from the higher timeframe (1W) and displayed on the current chart (even on 1m).
They’re drawn as dashed horizontal lines inside the visible chart area instead of being extended forever.
Each line is labeled with custom text input:
• Example defaults: PW High, PW Low
You can rename these in settings and change label color / background color.
This gives you prior-week liquidity targets even when you’re down on scalping timeframes.
(Optional future extension: current week high/low can also be added if you want developing weekly liquidity. Not currently shown by default.)
________________________________________
🔸 Monthly Liquidity
The script plots both:
• Previous Month High / Low
• Current Month High / Low (live)
Previous month levels are drawn with one style (default dashed + one color).
Current month levels are drawn with another (default solid + different color).
All four lines are labeled.
Labels are fully customizable:
• Text you want to display
• Label background color
• Label text color
• Label size
• Label opacity
This gives you HTF liquidity magnets on any timeframe down to 1m.
________________________________________
🔸 4H Liquidity Map (Intraday Bias Tool)
This part is meant for scalpers.
On any timeframe ≤ 4H, the script plots:
• Previous 4H High / Previous 4H Low
• Current 4H High / Current 4H Low
Important detail:
• These levels are ONLY drawn across their own 4-hour window.
• Previous 4H levels are drawn across the exact time span of the previous 4H candle.
• Current 4H levels are drawn across the current 4H candle as it forms.
• They do NOT extend across the whole day, so you can read structure candle-by-candle.
Visually:
• Previous 4H levels use one color/style (default dashed).
• Current 4H levels use another (default solid).
• Each has a label, e.g. P4H High, C4H Low, etc.
• You can rename the labels and recolor them in settings.
This helps you immediately see which 4H range you’re trading inside, where the internal liquidity sits, and whether price is working a raid of the previous 4H high/low.
________________________________________
🔸 Customization / Inputs
The script exposes inputs for:
• Session times (Asia / London / NY)
• Whether to show each session box
• Colors for each session box (border + fill)
• Opening Range length (minutes)
• Whether to show Asia/London/NY OR lines
• OR line color per session
• Line span length in bars (for higher timeframe levels, so they stay “near” current price instead of stretching off-screen)
• Label text for each level group:
o Prev Week
o Prev Month / Current Month
o Prev 4H / Current 4H
• Label style: size, text color, background color, background opacity
No hard-coded text. No forced color scheme. You can brand it for your own workflow.
________________________________________
How to Use It
1. Bias:
Use monthly / weekly levels to understand where the larger liquidity pools sit. Are we hunting last month’s high? Sitting above last week’s low?
2. Intra-session context:
Use session boxes + opening range to see when expansion is happening and whether price is accumulating (consolidation) or delivering (impulsive move) in that session.
3. Execution / scalps:
Use 4H (prev/current) highs and lows as liquidity reference points for stops / targets.
Common idea: wait for a raid of the previous 4H high during London or NY, at or above the OR high, then look for reversal orderflow.
4. Do not blindly long/short a level.
Levels are context. Your trade model / confirmation is still on you.
________________________________________
Notes / Limitations
• This tool is for visual reference only.
It does not generate buy/sell signals, alerts, or risk management for you.
• Session time inputs assume exchange time / chart time. Make sure your chart is set to the session timezone you expect.
• Because TradingView limits drawings, if you scroll extremely far back in time on very low timeframes, some older objects may recycle. This is normal.
________________________________________
Disclaimer
This script is for educational/visual study purposes only.
It is NOT financial advice.
Trading in leveraged / derivative / FX / crypto products involves significant risk and can result in loss of capital.
You are responsible for your own decisions.
Special Thanks to HIVE Community

VWAP Composites📊 VWAP Composite - Advanced Multi-Period Volume Weighted Average Price Indicator
═══════════════════════════════════════════════════════════════════
🎯 OVERVIEW
VWAP Composite is an advanced volume-weighted average price (VWAP) indicator that goes beyond traditional single-period VWAP calculations by offering composite multi-period analysis and unprecedented customization. This indicator solves a common problem traders face: traditional VWAP resets at arbitrary intervals (session start, day, week), but significant price action and volume accumulation often spans multiple periods. VWAP Composite allows you to anchor VWAP calculations to any timeframe—or combine multiple periods into a single composite VWAP—giving you a true representation of average price weighted by volume across the exact periods that matter to your analysis.
═══════════════════════════════════════════════════════════════════
⚙️ HOW IT WORKS - CALCULATION METHODOLOGY
📌 CORE VWAP CALCULATION
The indicator calculates VWAP using the standard volume-weighted formula:
• Typical Price = (High + Low + Close) / 3
• VWAP = Σ(Typical Price × Volume) / Σ(Volume)
This calculation is performed across user-defined time periods, ensuring each bar's contribution to the average is proportional to its trading volume.
📌 STANDARD DEVIATION BANDS
The indicator calculates volume-weighted standard deviation to measure price dispersion around the VWAP:
• Variance = Σ / Σ(Volume)
• Standard Deviation = √Variance
• Upper Band = VWAP + (StdDev × Multiplier)
• Lower Band = VWAP - (StdDev × Multiplier)
These bands help identify overbought/oversold conditions relative to the volume-weighted mean, with high-volume price excursions having greater impact on band width than low-volume moves.
📌 COMPOSITE PERIOD METHODOLOGY (Auto Mode)
Unlike traditional VWAP that resets at fixed intervals, Auto Mode creates composite VWAPs by combining the current period with N previous periods:
• Period Span = 1: Current period only (standard VWAP behavior)
• Period Span = 2: Current period + 1 previous period combined
• Period Span = 3: Current period + 2 previous periods combined
• And so on...
Example: A 3-period Weekly composite VWAP calculates from the start of 2 weeks ago through the current week's end, creating a single VWAP that represents 21 days of continuous price and volume data. This provides context about where price stands relative to the volume-weighted average over multiple weeks, not just the current week.
═══════════════════════════════════════════════════════════════════
🔧 KEY FEATURES & ORIGINALITY
✅ DUAL OPERATING MODES
1️⃣ MANUAL MODE (5 Independent VWAPs)
Define up to 5 separate VWAP calculations with custom start/end times:
• Perfect for anchoring VWAP to specific events (earnings, Fed announcements, major reversals)
• Each VWAP has independent color settings for lines and deviation band backgrounds
• Individual control over calculation extension and visual extension (explained below)
• Useful for tracking multiple institutional accumulation/distribution zones simultaneously
2️⃣ AUTO MODE (Composite Period VWAP)
Automatically calculates VWAP across combined time periods:
• Supported periods: Daily, Weekly, Monthly, Quarterly, Yearly
• Configurable period span (1-20 periods)
• Always up-to-date, recalculates on each new bar
• Ideal for systematic analysis across consistent timeframes
✅ DUAL EXTENSION SYSTEM (Manual Mode Innovation)
Most VWAP indicators only offer "on/off" for extending calculations. This indicator provides two distinct extension options:
🔹 EXTEND CALCULATION TO CURRENT BAR
When enabled, continues including new bars in the VWAP calculation after the defined end time. The VWAP value updates dynamically as new volume enters the market.
Use case: You anchored VWAP to a major low 3 weeks ago. You want the VWAP to continue evolving with new volume data to track ongoing institutional positioning.
🔹 EXTEND VISUAL LINE ONLY
When enabled (and calculation extension is disabled), projects the "frozen" VWAP value forward as a reference line. The VWAP value remains fixed at what it was at the end time, but the line and deviation bands visually extend to current price.
Use case: You want to see how price is behaving relative to the VWAP that existed at a specific point in time (e.g., "Where is price now vs. the 5-day VWAP that existed at last Friday's close?").
This dual system gives you unprecedented control over whether you're tracking a "living" VWAP that incorporates new data or using historical VWAP levels as static reference points.
✅ CUSTOMIZABLE STANDARD DEVIATION BANDS
• Adjustable multiplier (0.1 to 5.0)
• Independent background colors with opacity control for each VWAP
• Dashed band lines for easy visual distinction from main VWAP
• Bands extend when visual extension is enabled, maintaining zone visibility
✅ COMPREHENSIVE LABELING SYSTEM
Each VWAP displays:
• Current VWAP value
• Upper deviation band value (High)
• Lower deviation band value (Low)
• Extension status indicator (Calc Extended / Visual Extended)
• Color-coded for quick identification
═══════════════════════════════════════════════════════════════════
📖 HOW TO USE THIS INDICATOR
🎯 SCENARIO 1: EVENT-ANCHORED VWAP (Manual Mode)
Use case: A stock gaps down 15% on earnings and you want to track where institutions are positioning during the recovery.
Setup:
1. Switch to Manual Mode
2. Enable VWAP 1
3. Set Start Time to the earnings gap bar
4. Set End Time to current time (or leave far in future)
5. Enable "Extend Calculation to Current Bar"
6. Watch how price respects the VWAP as a dynamic support/resistance
Interpretation:
• Price above VWAP = buyers in control since the event
• Price testing VWAP from above = potential support
• Volume-weighted standard deviation bands show normal price range
• Price outside bands = potential exhaustion/mean reversion setup
🎯 SCENARIO 2: MULTI-WEEK INSTITUTIONAL ACCUMULATION ZONE (Auto Mode)
Use case: You trade swing setups and want to identify where institutions have been accumulating over the past 3 weeks.
Setup:
1. Switch to Auto Mode
2. Select "Weekly" period type
3. Set Period Span to 3
4. Enable standard deviation bands
Interpretation:
• 3-week composite VWAP shows the true average institutional entry
• Price bouncing off VWAP repeatedly = strong support (institutions defending their average)
• Price breaking below VWAP on high volume = potential distribution
• Deviation bands contracting = consolidation; expanding = volatility increase
🎯 SCENARIO 3: COMPARING MULTIPLE TIME HORIZONS (Manual Mode)
Use case: You want to see short-term vs medium-term vs long-term VWAP alignments.
Setup:
1. Switch to Manual Mode
2. VWAP 1: Last 5 trading days (blue)
3. VWAP 2: Last 10 trading days (orange)
4. VWAP 3: Last 20 trading days (purple)
5. Enable "Extend Calculation" for all
6. Set different background colors for visual separation
Interpretation:
• All VWAPs aligned upward = strong trend across all timeframes
• Price between VWAPs = finding equilibrium between different trader timeframes
• Short-term VWAP crossing long-term VWAP = momentum shift
• Price rejecting at higher-timeframe VWAP = that timeframe's traders defending their average
🎯 SCENARIO 4: HISTORICAL VWAP REFERENCE LEVELS (Manual Mode)
Use case: You want to see where the 1-month VWAP was at each month-end as static reference levels.
Setup:
1. Switch to Manual Mode
2. VWAP 1: Set to last month's start/end dates
3. VWAP 2: Set to 2 months ago start/end dates
4. VWAP 3: Set to 3 months ago start/end dates
5. Disable "Extend Calculation"
6. Enable "Extend Visual Line Only"
Interpretation:
• Each VWAP represents the volume-weighted average for that complete month
• These become static support/resistance levels
• Price returning to old monthly VWAPs = institutional memory/gap fill behavior
• Useful for identifying longer-term value areas
═══════════════════════════════════════════════════════════════════
🎨 CUSTOMIZATION OPTIONS
GENERAL SETTINGS
• Show/hide labels
• Line style: Solid, Dashed, or Dotted
• Standard deviation multiplier (impacts band width)
• Toggle standard deviation bands on/off
MANUAL MODE (Per VWAP)
• Custom start and end times
• Line color picker
• Background color picker (with transparency control)
• Extend calculation option
• Extend visual option
• Show/hide individual VWAPs
AUTO MODE
• Period type selection (Daily/Weekly/Monthly/Quarterly/Yearly)
• Period span (1-20 periods)
• Line color
• Background color (with transparency control)
═══════════════════════════════════════════════════════════════════
💡 TRADING APPLICATIONS
✓ Mean Reversion: Use deviation bands to identify stretched prices likely to return to VWAP
✓ Trend Confirmation: Price sustained above VWAP = bullish bias; below = bearish bias
✓ Support/Resistance: VWAP often acts as dynamic S/R, especially on higher volume periods
✓ Institutional Positioning: Multi-day/week VWAPs show where large players have established positions
✓ Entry Timing: Wait for pullbacks to VWAP in trending markets
✓ Stop Placement: Use VWAP ± standard deviation as volatility-adjusted stop levels
✓ Breakout Confirmation: Breakouts from consolidation with price reclaiming VWAP = stronger signal
✓ Multi-Timeframe Analysis: Compare short vs long-period VWAPs to gauge momentum alignment
═══════════════════════════════════════════════════════════════════
⚠️ IMPORTANT NOTES
• The indicator redraws on each bar to maintain accurate visual representation (uses `barstate.islast`)
• Maximum lookback is limited to 5000 bars for performance optimization
• Time range calculations work across all timeframes but are most effective on intraday to daily charts
• Standard deviation bands assume volume-weighted distribution; extreme events may violate assumptions
• Auto mode always calculates to current bar; use Manual mode for fixed historical periods
═══════════════════════════════════════════════════════════════════
This indicator is open-source. Feel free to examine the code, learn from it, and adapt it to your needs.

Choppiness Index | CipherDecodedThe Choppiness Index is a multi-timeframe regime indicator that measures whether price action is trending or consolidating.
This recreation was inspired by the Choppiness Index chart from Checkonchain, with full credit to their team for the idea.
🔹 How It Works
CI = 100 * log10( SUM(ATR(1), n) / (highest(high, n) – lowest(low, n)) ) / log10(n)
Where:
n – lookback length (e.g. 14 days / 10 weeks / 10 months)
ATR(1) – true-range of each bar
SUM(ATR(1), n) – total true-range over n bars
highest(high, n) and lowest(low, n) – price range over n bars
Low values → strong trend
High values → sideways consolidation
Below is a simplified function used in the script for computing CI on any timeframe:
f_ci(_n) =>
_tr = ta.tr(true)
_sum = math.sum(_tr, _n)
_hh = ta.highest(high, _n)
_ll = ta.lowest(low, _n)
_rng = _hh - _ll
_rng > 0 ? 100 * math.log10(_sum / _rng) / math.log10(_n) : na
Consolidation Threshold — 50.0
Trend Threshold — 38.2
When Weekly CI < Trend Threshold, a trending zone (yellow) appears.
When Weekly CI > Consolidation Threshold, a consolidation zone (purple) appears.
Users can toggle either background independently.
🔹 Example Background Logic
bgcolor(isTrend and Trend ? color.new(#f3e459, 50) : na, title = "Trending", force_overlay = true)
bgcolor(isConsol and Cons ? color.new(#974aa5, 50) : na, title = "Consolidation", force_overlay = true)
🔹 Usage Tips
Observe the Weekly CI for regime context.
Combine with price structure or trend filters for signal confirmation.
Low CI values (< 38) indicate strong trend activity — the market may soon consolidate to reset.
High CI values (> 60) reflect sideways or range-bound conditions — the market is recharging before a potential new trend.
🔹 Disclaimer
This indicator is provided for educational purposes.
No trading outcomes are guaranteed.
This tool does not guarantee market turns or performance; it should be used as part of a broader system.
Use responsibly and perform your own testing.
🔹 Credits
Concept origin — Checkonchain Choppiness Index
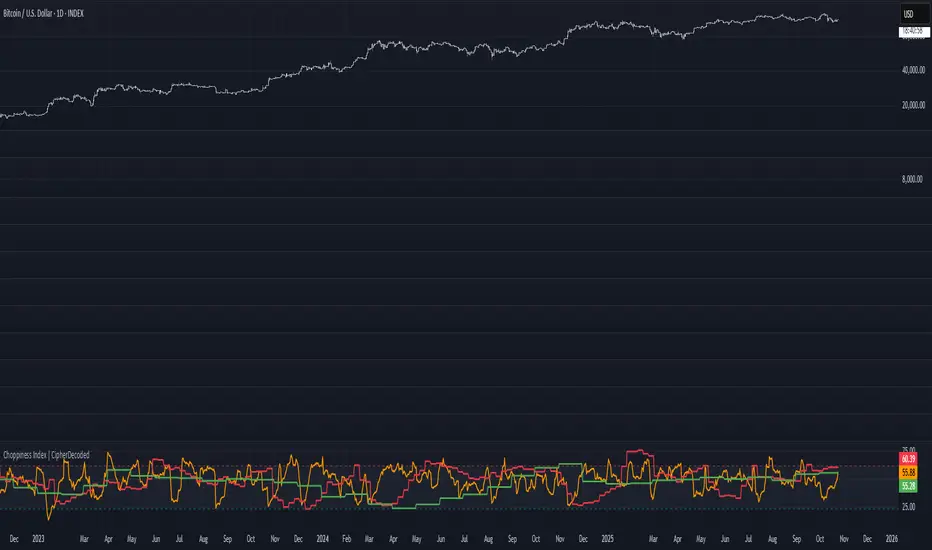
Syndicate Bias Universal (Auto)Syndicate Bias Universal (Auto): A Masterclass in Time-Based Trading
Chapter 1: The Modern Trader's Dilemma—A New Framework for a Noisy Market
In today's hyper-connected financial markets, the modern trader is faced with a profound paradox: we have access to more information than ever before, yet achieving consistent clarity has never been more challenging. We are inundated with a relentless stream of price data, countless indicators, breaking news, and expert opinions. This information overload often leads not to better decision-making, but to analysis paralysis, emotional trading, and a chronic sense of being one step behind the market's true intentions.
The fundamental problem that Syndicate Bias Universal (Auto) addresses is this struggle for clarity amidst the noise. It challenges the conventional approach of relying solely on price- and volume-based indicators, which are inherently lagging and often produce conflicting signals. Instead, it introduces a crucial, and often overlooked, third dimension to technical analysis: time.
This indicator is not merely another tool to be added to a cluttered chart; it is a comprehensive, systematic framework designed to reinterpret market dynamics through the structured lens of trading sessions. Its core function is to deconstruct any trading period—from an entire week down to the smallest intraday segments—into a clear, four-part narrative structure, which we call "Quarters."
Many traders can correctly identify a market's general direction but consistently struggle with the critical question of when to act. This timing issue leads to the most common trading errors: entering positions too early only to be stopped out by volatility, entering too late and catching the tail-end of a move, or being whipsawed by directionless chop. This script provides a logical, rules-based solution by identifying a specific, high-probability time window within each session where reversal setups are most likely to occur. It is built for the discerning trader who is ready to evolve—to move beyond reactive, emotionally-driven decisions and adopt a structured, patient, and objective methodology for market engagement. It is, in essence, an operating system for disciplined trading.
Chapter 2: The Core Philosophy—Viewing the Market as a Four-Quarter Game
At its heart, this indicator operates on a powerful principle: market sessions, regardless of their duration, exhibit a discernible rhythm and structure, much like a four-quarter game of football, a four-act theatrical play, or the four seasons of a year. Price action is not a chaotic, random walk. It is a story unfolding, driven by the collective psychology of millions of participants. This story often follows a recurring pattern of opening, exploration, climax, and resolution.
By dividing trading sessions into four distinct quarters, we can better contextualize this narrative. This temporal structure acts as a powerful filter, cutting through the incessant noise of minor price fluctuations and focusing the trader's attention on the moments that truly matter.
Quarter 1 (The Opening Act): This is the period of price discovery. The market is absorbing overnight news, and early participants are establishing their initial positions. The character of this quarter—whether it is quiet and rotational or strong and directional—provides crucial clues about the session's potential.
Quarter 2 (The Exploration): Following the initial open, the market begins to test the levels established in Q1. This is often a period of consolidation or early trend development, where weaker hands are shaken out.
Quarter 3 (The Climax): Often, this is where the session's primary, decisive move occurs. It can be a powerful trend continuation or, critically, a major reversal point where the initial momentum shows signs of exhaustion.
Quarter 4 (The Resolution): This is the closing period, characterized by profit-taking, late-day position adjustments, and a general decrease in volume as the session winds down.
This is not a "black box" system promising guaranteed results. It is a transparent methodology built on a clear, logical foundation of session analysis. Its purpose is to empower you with a deeper understanding of market behavior, transforming you from a mere participant, tossed about by the market's waves, into a patient observer who waits for specific, high-probability conditions to align before acting. Embracing this philosophy is the first and most crucial step to unlocking the tool's full potential.
Chapter 3: The Engine—Key Features & In-Depth Principles
This section dissects the sophisticated mechanics that power the indicator. Each feature is designed to work in concert, creating a robust and adaptive analytical engine.
Feature 1: Universal Market Adaptability—A Global, Intelligent Tool
A significant weakness of many trading tools is their inherent rigidity. An indicator fine-tuned for the unique volatility profile and session times of the New York open will invariably underperform or provide false signals when applied to the different rhythms of the Indian or Asian markets. Syndicate Bias Universal eradicates this problem with a sophisticated, dual-mode adaptability engine.
Intelligent Auto-Detection: This is the default and recommended setting for most traders. When the "Market Type" input is set to "Auto," the script becomes a dynamic, context-aware tool. It intelligently queries the exchange information (syminfo.prefix) of the instrument you are currently viewing. It automatically recognizes major Indian exchanges (NSE, BSE, MCX) and all other global exchanges. Based on this identification, it seamlessly applies the correct session timing logic—using "Asia/Kolkata" for Indian instruments and "America/New_York" for global instruments (Forex, Commodities, US Equities, etc.).
This allows traders with a diverse watchlist to move effortlessly from analyzing the NIFTY 50 to EUR/USD to Crude Oil, confident that the underlying temporal analysis remains precise, relevant, and correctly calibrated to the dominant trading hours of each asset. There is no need for manual adjustment or multiple chart templates; the indicator handles the complex work of timezone alignment for you.
Focused Manual Override: For the advanced trader, the manual override provides an indispensable layer of analytical control. There are specific scenarios where locking the indicator to a particular time zone, regardless of the asset being viewed, is crucial.
Cross-Market Influence Analysis: A European trader analyzing the DAX index might want to lock the indicator to "Global" (New York) time during the afternoon to see how the US open influences the German market's behavior in its final hours.
Commodity and Forex Trading: A trader in Asia specializing in WTI Crude Oil or Gold knows that these markets are heavily dominated by the New York session. By locking the indicator to "Global," they can apply the correct temporal structure to their analysis, even if their local time is different.
Consistent Strategy Application: A trader who has developed a strategy based purely on the London/New York session overlap can lock the indicator to "Global" and apply this single, consistent framework across any and all instruments they trade.
This dual-mode system ensures that the indicator is both effortlessly simple for those who need it to be and powerfully flexible for those who require granular control.
Feature 2: Fractal Quarter-Based Analysis—Structure at Every Scale
The term "fractal" in market analysis refers to the principle that the same patterns of collective human behavior—driven by greed, fear, hope, and indecision—manifest repeatedly across all timeframes. A pattern that takes months to unfold on a weekly chart can play out in a matter of minutes on a one-minute chart. The Syndicate Bias Universal indicator is built on this very principle, applying its Four-Quarter structure consistently from the highest macro view down to the lowest micro view.
This provides a unified, coherent framework for analysis, regardless of your trading style.
The Weekly Quarter (The Position Trader's View): At this macro level, the trading week is divided into four primary segments (e.g., Monday, Tuesday, Wednesday, Thursday). This perspective is invaluable for position traders and long-term investors. It helps answer critical strategic questions: Is the week's opening action on Monday establishing a trend that will likely hold, or is it creating the conditions for a mid-week reversal? The weekly quarters help contextualize the larger battle between long-term buyers and sellers.
The Daily Quarter (The Swing Trader's View): Here, the full 24-hour global trading day is partitioned into four 6-hour quarters. This is the ideal lens for swing traders and day traders who aim to capture the dominant move of the day or a multi-day swing. It helps them avoid the morning "chop" by understanding the initial price discovery phase and position themselves for the more decisive moves that often occur in the later quarters of the global session.
Intraday Quarters: 90min, Micro, and Nano (The Day Trader's & Scalper's View): For traders operating on the front lines of intraday price action, the script drills down with surgical precision. It breaks down shorter sessions into their own complete four-quarter cycles. This granular view is essential for timing precise entries, managing trades with tight stop-losses, and understanding the micro-rhythms of order flow. It helps scalpers identify high-probability windows to trade, while allowing them to step back and avoid periods of low liquidity or erratic price action.
To keep you anchored, the script automatically selects and displays the relevant analysis timeframe ("Auto TF") in a non-intrusive display on your chart. This seemingly simple feature is a crucial navigational tool, constantly reminding you of the specific temporal context the engine is currently analyzing, ensuring your decisions are always aligned with the appropriate structural scale.
Feature 3: The "S-Quarter" Timing Window—The Art of Strategic Patience
This is the intellectual core of the indicator and its most powerful feature. It is the mechanism that transforms trading from a constant, stressful hunt for opportunities into a calm, disciplined, and strategic wait. The S-Quarter (Search Quarter) engine enforces patience by activating its search for trade setups only within a specific, algorithmically determined time window.
The Q1 Volatility Profile Analysis: The process begins at the start of a new session. The indicator's logic performs a sophisticated analysis of the price action within the first quarter (Q1). It looks beyond simple direction and evaluates its character. This involves assessing the nature of the opening period's volatility. Is the range expanding or contracting? Is the price action rotational and indecisive, or is it directional and backed by momentum? A quiet, low-volatility Q1 suggests a different market psychology and implies a very different probabilistic path for the rest of the session compared to a strong, high-volume, trend-setting Q1.
Dynamic and Adaptive Window Selection: Based on this nuanced Q1 profile, the script makes a critical, forward-looking determination: which of the subsequent quarters (Q2, Q3, or Q4) is most likely to host a significant market turning point, a liquidity grab, or an exhaustion event. This designated period is the "S-Quarter." The selection is dynamic and adaptive:
If Q1 was a powerful, trending move, the engine might identify Q3 as the S-Quarter, anticipating that the initial momentum will wane, drawing in late trend-followers just in time for a sharp reversal.
If Q1 was a tight, rotational range, the engine might identify Q2 as the S-Quarter, anticipating that the first breakout attempt from this range will likely be a "head fake" designed to trap traders before the real move begins in the opposite direction.
This intelligent selection is what sets the tool apart. It doesn't use a fixed, one-size-fits-all timing window. It adapts its search to the unique, unfolding conditions of each individual trading session. The S-Quarter is the only time the script will actively look for and display trade setups. This powerful filter is the key to mastering trading psychology. It prevents impulsive entries, eliminates the fear of missing out (FOMO), dramatically reduces exposure to choppy and unpredictable market periods, and aligns your actions with the moments of highest probabilistic edge.
Feature 4: Contrarian Reversal Setups—Identifying Market Exhaustion
The setups generated by this indicator are contrarian by design. They are not trend-following signals. They are based on the principle of identifying moments where a prevailing short-term move is reaching a point of exhaustion, often culminating in a "liquidity grab."
The Mechanics of a Liquidity Grab: Within the pre-defined S-Quarter, the script vigilantly monitors short-term market structure, specifically the pivot highs and pivot lows. A break of a recent, significant pivot is a critical event. The script's logic posits that during the S-Quarter, these breakouts are often not the beginning of a sustained new trend. Instead, they are frequently a calculated move by institutional players to "run the stops"—a stop hunt designed to trigger the stop-loss orders of retail traders who are positioned on the wrong side of the market. This action injects a surge of liquidity into the market, which is precisely what larger players need to fill their large orders in the opposite direction.
Bullish Reversal Setup (Fading the Low): This setup is triggered by a break below a recent structural low during the S-Quarter. This event signals that the sellers who pushed the price to a new low may have exhausted their power in the process of running the stops. The trap has been set, and this alert serves as a potential turning point where buyers are likely to step in with force.
Bearish Reversal Setup (Fading the High): This setup is triggered by a break above a recent structural high during the S-Quarter. This suggests that the final, euphoric wave of buying pressure may be culminating in a liquidity grab. The last of the breakout buyers have been drawn in at the worst possible price, presenting an opportunity for informed sellers to take control and initiate a move downwards.
It is absolutely essential to understand that these are high-probability setups, not automated entry signals. They are sophisticated alerts that tell you, "The conditions are now ripe for a potential reversal within our strategic time window." The final decision to execute a trade, and the management of that trade, always rests with you, the trader.
Chapter 4: The Workflow—A Step-by-Step Guide to Practical Application
This section provides a clear, actionable workflow for integrating the Syndicate Bias Universal indicator into your daily trading routine.
Step 1: Initial Configuration (The Pre-Flight Check). Begin by setting the "Market Type." For maximum efficiency across a varied watchlist, leave it on "Auto." If you are a specialist who focuses on one specific market session, manually select "Global" or "Indian" to lock in your preferred analytical framework. Ensure other visual settings, like "Show Active Quarter Boxes," are enabled.
Step 2: Contextualize the Session (Reading the Field). At the start of your trading day, observe the quarter boxes as they begin to form. Pay attention to the story they tell. Is the Q1 box narrow and tight, suggesting indecision? Is it wide and directional, suggesting a strong opening sentiment? This visual context helps you build an intuitive feel for the session's rhythm long before any signal appears.
Step 3: Exercise Strategic Patience (The Professional's Edge). This is the most critical and often the most difficult step. The script will automatically perform its Q1 analysis and silently determine the S-Quarter. Your job is to wait. Resist the urge to trade during the other quarters. This disciplined inaction is not passive; it is an active strategy. It conserves your mental and financial capital for the moments that count the most.
Step 4: The Alert (The Call to Action). When a label—"Look for Bullish/Bearish reversal"—appears on your chart, it is your cue to shift from a passive, observational state to an active, analytical one. This is the moment you have been waiting for. Do not instantly click "buy" or "sell." The alert is a call to focus your attention, not a command to act blindly.
Step 5: The Confirmation Process (Your Personal Edge). The setup is the start, not the end, of your trade analysis. This is where you apply your own skills to confirm the validity of the setup. For example, upon seeing a Bullish Reversal Setup:
Candlestick Analysis: Look for confirmation candles like a powerful bullish engulfing bar, a hammer, or a dragonfly doji forming right after the new low was made.
Volume Analysis: Check if the move to the new low was on high, climactic volume that suddenly dried up, followed by an increase in volume as the price starts to reverse.
Indicator Confluence: Look for bullish divergence on an oscillator like the RSI or MACD, where price makes a new low but the indicator makes a higher low.
This confirmation process is what integrates the indicator into your unique trading style, making it exponentially more powerful.
Step 6: Execute and Manage Risk (The Business of Trading). Once you have your confirmation, execute your trade according to your plan. Risk management is paramount. A logical stop-loss for a Bullish Reversal Setup would typically be placed just below the low of the liquidity grab candle. Your take-profit targets should be based on your analysis of key resistance levels. Always ensure the potential reward of the trade justifies the initial risk. A setup is a probabilistic edge, not a certainty.
Chapter 5: The Trader's Mind—Mastering the Psychology of Time
Integrating this tool effectively is as much about mastering psychology as it is about technical analysis. Its very design encourages the development of a professional trading mindset.
From Impulsive to Patient: The S-Quarter forces you to wait for the market to come to you, curing the impulsive need to be "in a trade" at all times.
From Reactive to Proactive: You are no longer reacting to every price tick. You have a proactive plan: you know which time window you are interested in and what condition you are waiting for. This puts you in a position of mental control.
Building Unshakeable Discipline: By consistently following the framework, you are building the muscle of discipline. You learn that often the most profitable action is no action at all.
Conquering FOMO (Fear Of Missing Out): FOMO is driven by unstructured, random trading. When you know you are only interested in a specific type of setup within a specific time window, the moves that happen outside of that framework become irrelevant noise. You cannot miss a move you were never supposed to take.
Gaining Confidence Through Structure: The clarity and structure provided by the Four-Quarter framework build immense confidence. You are not guessing; you are executing a well-defined plan based on a logical, repeatable methodology.
Chapter 6: Frequently Asked Questions & Scenarios
Q: What happens if no setup appears during the S-Quarter?
A: This is one of the most valuable outcomes the indicator can provide. It means that during the high-probability window, the market did not produce a clear exhaustion or liquidity grab event. The script has effectively told you that the conditions were not optimal for a high-probability reversal, and the correct decision was to preserve your capital. A null signal is a powerful signal in itself.
Q: Can I use this indicator with my existing trend-following strategy?
A: Absolutely. In fact, it's a perfect combination. You can use your macro trend-following tools to establish the dominant weekly or daily direction. Then, you can use the Syndicate Bias Universal indicator on a lower timeframe to look for contrarian setups that signal the end of a pullback, allowing you to enter the trade in the direction of the larger trend at a much better price.
Q: Which analysis timeframe ("Auto TF") is the 'best' one to use?
A: There is no "best" timeframe; there is only the timeframe that is right for your trading style. This is precisely why the fractal design is so powerful. A long-term swing trader might focus primarily on the signals generated by the Daily quarters, while a high-frequency scalper will live within the Micro and Nano quarters. The indicator adapts to you, not the other way around. Experiment and find the resolution that best suits your personality and trading goals.

OSOK AMERICANA [TakingProphets]OVERVIEW
OSOK is an ICT-inspired execution framework designed to help traders map the interaction between Higher-Timeframe (HTF) liquidity sweeps, qualifying Order Blocks, and Current-Timeframe (CTF) confirmation signals — all within a single, structured workflow.
By sequencing an HTF CRT → Order Block → CTF CRT model and integrating IPDA 20 equilibrium context, this tool provides traders with a visual framework for aligning intraday execution decisions with higher-timeframe intent. All plotted elements — sweeps, blocks, open prices, and equilibrium levels — update continuously in real time.
-----------------------------------------------------------------------------------------------
Core Concepts (ICT-Based)
-----------------------------------------------------------------------------------------------
Candle Range Transition (CRT) Sweeps
Bullish CRT → The second candle runs below the first candle’s low and closes back inside its range.
Bearish CRT → The second candle runs above the first candle’s high and closes back inside its range.
These patterns are frequently associated with liquidity grabs and potential directional shifts.
HTF → CTF Alignment
-Detects valid HTF CRTs (e.g., Daily CRTs derived from H4 or Weekly CRTs derived from Daily).
-Locates a qualifying Order Block within HTF Candle-2 to identify areas of potential interest.
-Waits for a modified CRT confirmation on the current timeframe before signaling possible directional bias.
IPDA 20 Equilibrium
-Plots the midpoint of the daily highest and lowest prices over the last 20 periods.
-Provides a visual reference for premium and discount pricing zones.
-----------------------------------------------------------------------------------------------
How OSOK Works
-----------------------------------------------------------------------------------------------
Step 1 — HTF CRT Check
On each new HTF candle, the script scans for a clean CRT formation on the higher aggregation (e.g., H4 → D or D → W).
If found, it tags the candles as C1, C2, and C3 and optionally shades their backgrounds for clear visual parsing.
Step 2 — HTF Order Block Identification
Searches within HTF Candle-2 for a qualifying Order Block using a compact pattern filter.
Draws a persistent OB level with clear labeling for context.
Step 3 — CTF Confirmation (Modified CRT)
Monitors your current chart timeframe for a modified CRT in alignment with the HTF setup:
For bullish setups → waits for a bullish modified CRT and close above C1’s high zone.
For bearish setups → expects a bearish modified CRT and close below C1’s low zone.
Step 4 — Real-Time Maintenance
All labels, lines, and background spans update intrabar.
If the setup invalidates — for example, if implied targets are exceeded before entry — the layout resets and waits for the next valid sequence.
-----------------------------------------------------------------------------------------------
KEY FEATURES
-----------------------------------------------------------------------------------------------
HTF CRT Visualization
-Optional “×” markers on Daily/Weekly CRT sweeps.
-Independent background shading for C1, C2, and C3.
Order Block + Open Price Context
-Draws HTF Order Block levels and plots C3 Open Price (DOP) for additional directional reference.
CTF CRT Execution Cue
-Displays a modified CRT on your current timeframe when conditions align with the HTF narrative.
IPDA 20 Line + Label
-Plots a dynamic midpoint level with an optional label for quick premium/discount context.
Optimized Drawing Engine
-Lightweight, efficient use of chart objects ensures smooth performance without visual clutter.
INPUTS
-Higher Timeframe Settings
-Toggle markers for Daily/Weekly CRT sweeps.
-Enable and color C1, C2, and C3 background spans.
-IPDA Display Options
-Control visibility, color, and line style for IPDA 20 equilibrium levels.
-Sweep, OB, and Open Price Styles
-Per-element customization for colors, widths, and labels.
-----------------------------------------------------------------------------------------------
BEST PRACTICES
-----------------------------------------------------------------------------------------------
Start on H4 or Daily to identify valid HTF CRT formations.
Confirm a qualifying OB inside Candle-2.
Drop to your execution timeframe and wait for the modified CTF CRT confirmation before acting.
Use IPDA 20 equilibrium as a reference for premium vs. discount zones.
Combine with your ICT session bias and overall market context for optimal decision-making.
-----------------------------------------------------------------------------------------------
Important Notes
-----------------------------------------------------------------------------------------------
OSOK is not a buy/sell signal provider. It’s a visual framework for understanding ICT-based execution models.
All objects reset automatically when new HTF candles form or setups invalidate.
Works on any symbol and timeframe by default, with HTF mapping set to H4 → D and D → W.
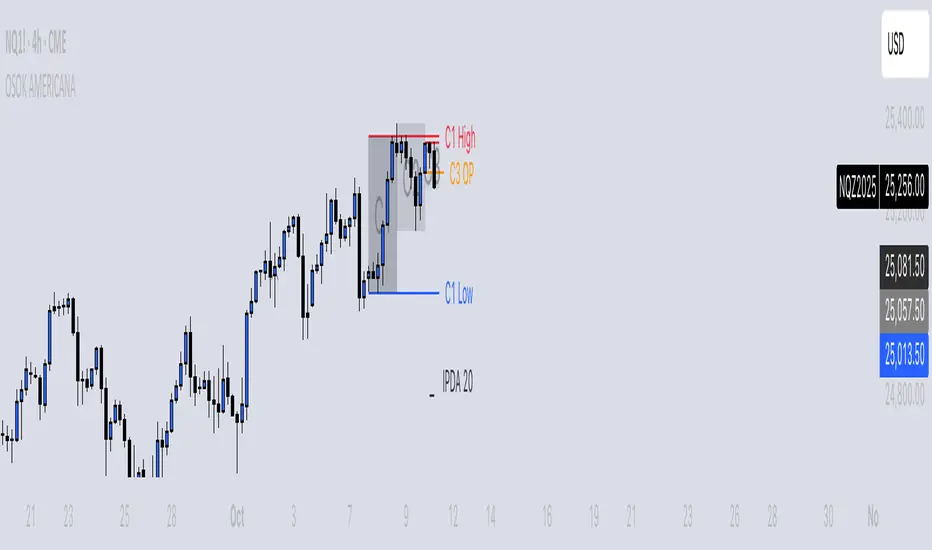
Previous Day & Week High/Low LevelsPrevious Day & Week High/Low Levels is a precision tool designed to help traders easily identify the most relevant price levels that often act as strong support or resistance areas in the market. It automatically plots the previous day’s and week’s highs and lows, as well as the current day’s developing internal high and low. These levels are crucial reference points for intraday, swing, and even position traders who rely on price action and liquidity behavior.
Key Features
Previous Day High/Low:
The indicator automatically draws horizontal lines marking the highest and lowest prices from the previous trading day.
These levels are widely recognized as potential zones where the market may react again — either rejecting or breaking through them.
Previous Week High/Low:
The script also tracks and displays the high and low from the last completed trading week.
Weekly levels tend to represent stronger liquidity pools and broader institutional zones, which makes them especially important when aligning higher timeframe context with lower timeframe entries.
Internal Daily High/Low (Real-Time Tracking):
While the day progresses, the indicator dynamically updates the current day’s internal high and low.
This allows traders to visualize developing market structure, identify intraday ranges, and anticipate potential breakouts or liquidity sweeps.
Multi-Timeframe Consistency:
All levels — daily and weekly — remain visible across any chart timeframe, from 1 minute to 1 day or higher.
This ensures traders can maintain perspective and avoid losing track of key zones when switching views.
Customizable Visuals:
The colors, line thickness, and label visibility can be easily adjusted to match personal charting preferences.
This makes the indicator adaptable to any trading style or layout, whether minimalistic or detailed.
How to Use
Identify Key Reaction Zones:
Observe how price interacts with the previous day and week levels. Rejections, consolidations, or clean breakouts around these lines often signal strong liquidity areas or potential directional moves.
Combine with Market Structure or Liquidity Concepts:
The indicator works perfectly with supply and demand analysis, liquidity sweeps, order block strategies, or simply classic support/resistance techniques.
Scalping and Intraday Trading:
On lower timeframes (1m–15m), the daily levels help identify intraday turning points.
On higher timeframes (1h–4h or daily), the weekly levels provide broader context and directional bias.
Risk Management and Planning:
Using these levels as reference points allows for more precise stop placement, target setting, and overall trade management.
Why This Indicator Helps
Markets often react strongly around previous highs and lows because these zones contain trapped liquidity, pending orders, or institutional decision points.
By having these areas automatically mapped out, traders gain a clear and objective view of where price is likely to respond — without needing to manually draw lines every day or week.
Whether you’re a beginner still learning about price structure, or an advanced trader refining entries within liquidity zones, this tool simplifies the process and keeps your charts clean, consistent, and data-driven.

Bubble ChartBubble Chart- Visual Market Intelligence
⸻
⚡ Quick Start - Here is how you get started in 30 seconds
Default view (Y-axis: None) = market heatmap
X-axis always = performance
Bubble size = importance (your choice of metric)
Hover any bubble for details
Switch timeframes to change the measurement window
Pick any stock ticker to see their friends
Pick one of the 143 etfs listed below and see their top constituents
That's it. Everything else is deeper cuts of data
⸻
Overview
The Bubble Chart is a market-wide visual map designed to instantly reveal how thousands of stocks and ETFs are performing relative to their peers, all in a single glance.
It dynamically builds relationships between ~3,400 stocks and 143 ETFs , each with its own “friends list” of most-connected tickers. It’s a bit unlike all the other indicators, which you’ll see shortly. It’s a very Tops Down, then Sideways view of the market.
The 144 ETFs covered in the Bubble Chart indicator are listed here in this watchlist: www.tradingview.com
Each bubble represents a security.
X-axis → performance (% change)
Y-axis → variable (you choose the insight)
Bubble size → market cap, relative weight, or %volume
Color → relative performance (green up, red down)
Border → sector color
Your current chart’s timeframe determines the measurement window:
Intraday chart → today so far
Daily chart → week-to-date (WTD)
Weekly chart → month-to-date (MTD)
Monthly chart → year-to-date (YTD)
Everything is relative to that timeframe’s performance window — making it as useful for morning scans as for long-term sector rotations. I recommend starting with an intraday chart. The bubbles represent the day so far on this timeframe.
⸻
📦 Version Differences
Bubble Chart Lite (Free):
✓ All features and dimensions
✓ Up to 5 bubbles displayed
✓ Perfect for tracking top movers
Bubble Chart (Invite-Only):
✓ All features and dimensions
✓ Up to 38 bubbles displayed
✓ See actual market breadth and structure
✓ Indicator name: “Bubble Chart”
✓ Available under the indicator “Bubble Chart” (Invite-Only) — details on my profile
⸻
📊 Y-Axis Options
1. “None” - Heatmap Mode
By default, the Y-axis is set to “None”.
In this mode, the chart functions as a market heatmap, with:
Left-to-right representing relative performance (% change)
Bubble color indicating gain/loss
Bubble size reflecting your chosen metric (Market Cap, Weight, or %Volume)
Up-down randomized just for bubble separation
Think of it as a fancy heatmap with extra context — sector coloring, bubble sizing, and tooltips that surface live data.
Perfect for a quick snapshot of the day’s winners and losers across your selected universe.
⸻
1. %Turnover
This measures conviction behind each move.
Turnover = current money flow vs. average money flow over your lookback window.
A large % move with low turnover = a weak move with little backing.
A moderate % move with high turnover = strong participation, higher conviction.
This is my personal favorite morning setup — it instantly reveals where real buying and selling pressure is emerging as the session unfolds.
A horizontal line across your selected ticker acts as a benchmark, so you can compare others’ conviction levels relative to it.
Any %turnover score >100 means more money than average is flowing in and out of this name. In the example above, ELS, AMT, SUI, and PSA were positive on the day and saw more than the average amount of money being transacted on these tickers today. Do the same for the negative (KIM, ESS, HST, etc), and you know where the money is going. Below 100, the move lacked conviction.
⸻
2. %ATR
Measures range expansion or compression relative to average volatility.
A stock can move big in price but stay inside a tight range → no expansion.
A stock can move little but break its typical volatility boundary → range expansion.
Expansion often signals momentum continuation; compression after large moves can precede turnarounds or consolidations.
This view helps you spot early volatility inflection points.
In the example above, in XLRE, you can see there are a lot of companies that are experiencing a range expansion to the downside. These stocks are now short setup stocks, as the power is pretty overwhelming (number of top companies as well as magnitude over the 100 index). However, there are 3 Stocks that are doing something completely different than the rest. AMT, SBAC, and CCI are experiencing range expansion (volatility) to the upside. These may become the new leaders. You would have to inspect each ticker to see what’s going on.
⸻
3. ROC(5) Z-Score
Z-Score quantifies how far a data point deviates from its mean, measured in standard deviations.
Here it’s applied to 5-period Rate of Change (ROC5).
A high positive Z-Score = performance far above its historical average.
A low (negative) Z-Score = deeply oversold vs. history.
Use this view to identify stretched momentum or mean-reversion candidates:
Stocks high on the Y-axis and green = extended upside momentum
Stocks high but red = potential reversal zones
Stocks low and red = extreme washouts that may soon rebound
This makes it a powerful stock-picking lens for traders who look for reversions or contrarian entries.
The following is the XLU and its 5 top holdings. Looked at on the daily timeframe, which means the ROC(5) score is for its weekly ROC (see timeframe discussion above).
What you can see here is most stocks are within their normal acceleration band. However BIIB is very close to -200. This is uncommon.As you can see from the chart of BIIB with it’s ROC(5) graphed below it, this does indicate a short term turn, and is a high probability long setup.
⸻
4. RSI(15) Z-Score
Similar to the ROC version, but based on RSI(15).
It contextualizes RSI against its own historical distribution, not the fixed 0–100 scale.
When RSI’s Z-Score is above +100 → historically overbought.
Below -100 → historically oversold.
A stock with a high RSI Z-Score but negative performance may be starting to roll over.
A stock with a low RSI Z-Score but positive performance could be beginning a rebound.
This lens is especially powerful for early spotting of turning points in swing and position trades.
In this view, we can see a bunch of stocks that are at or below their -200 Z-Score which suggests RSI is going to increase soon. Taking a look at KKR, we see that it is indeed an area where we might want to look for a short term bounce. .
⸻
5. %52-Week High / %52-Week Low
These two let you visualize positioning within the broader yearly range.
%52-Week High:
Shows how close each ticker is to its highs. Stocks near the top may be in breakout mode.
%52-Week Low:
Shows distance from the lows. Watching these can highlight potential recovery trades — many reversals start when beaten-down stocks begin to cluster and climb from their lows.
Are you really going to want to mess around with VZ? Other companies are winning the race
⸻
⚙️ Bubble Size Options
Market Cap-
Larger companies = larger bubbles.
Ideal for weighting visibility by overall size of influence in the market or sector.
ETF/Friend Weight-
Scales bubbles by their relationship weight to the target ETF or stock.
This helps identify which peers or constituents exert the most pull within the current context.
%Volume-
This scales by relative volume to average volume.
Big bubbles here mean unusual activity, perfect for spotting where participation is surging.
⸻
👥 Friends — Relationship Mapping
Every ticker on the chart has its own “friends list.”
These aren’t arbitrary. They’re discovered through a multi-stage algorithm that analyzes co-occurrence of holdings across ETFs and sectors, roughly like social network analysis for stocks. This is what allows a chart of one stock to intelligently surface others that behave like it, whether through shared ETFs, sector overlap, or statistical co-presence.
Why Friends Matter: When you load AAPL, the chart doesn't just show random stocks. It shows AAPL's "friends", the tickers most connected to it through:
Shared ETF holdings
Sector relationships
Statistical co-movement
This means you're seeing AAPL's context, not just AAPL. Example: AAPL up 2% might look strong, but if all its friends are up 3-4%, AAPL is actually lagging. The chart reveals this instantly.
In this friendship look, you can see companies that are in better (and worse) shape for the month (we are looking at it on the “W” timeframe). If I didn’t own ORCL, INTC, or MU (hidden use tooltip), I should start looking at them.
⸻
Common Setups - do these today
Morning Momentum Scan: - Y-axis: %Turnover - Bubble Size: %Volume - Look for: Top-right quadrant (high performance + high conviction)
Reversal Hunting: - Y-axis: RSI(15) Z-Score - Look for: Red bubbles above +100 (overbought rolling over) Green bubbles below -100 (oversold bouncing)
Sector Rotation: - Y-axis: None (heatmap mode) - Bubble Size: Market Cap - Look for: Color clustering by sector (border colors)
⸻
🧩 Data Sources
ETF Constituents:
ETF holdings are derived from information filed with the SEC’s EDGAR database, specifically N-PORT-P filings. These filings are public records submitted by ETF issuers.
Because EDGAR data can vary in structure and naming conventions, additional parsing, fuzzy matching, and ticker reconciliation logic were applied. Some inconsistencies may remain, and minor inaccuracies are possible.
EDGAR filings can also lag slightly behind real-time changes to ETF portfolios; however, for this visualization tool, that level of latency does not materially affect its purpose or insights.
Exchange & Share Count Data:
Information on exchanges and outstanding shares primarily comes from the SEC Company Facts API.
When unavailable, supplemental values are inferred from public SEC filings such as 8-K, 10-Q, and 10-K reports, and the SEC Company Submissions API for general company metadata.
All such data is publicly accessible through the SEC’s online systems.
I will update the SEC information on the ETFs once every 3 months to ensure etf constituent accuracy.
Sector & Industry Classification:
Sector and industry classifications were developed through a custom workflow that combines automated and human-reviewed methods.
An internal AI system analyzed each company’s publicly available website information to summarize business activities and assign one of 144 custom-defined industry categories.
Results were cross-checked by multiple independent classification models, and any uncertain outputs were manually reviewed for accuracy.
To improve interpretive consistency, publicly available information from StockAnalysis.com was also referenced (not republished) to inform final classifications.
Their content was used in accordance with their stated policy allowing limited reference with attribution — no full content or proprietary data was reproduced.
⸻
🚀 How to Use It
Load the Bubble Chart on any stock, ETF, or futures symbol.
Choose your Y-axis insight — start with “None” for the heatmap.
Adjust bubble size to highlight capital weight or activity.
Switch timeframes to shift context (today, this week, month, or year).
Hover bubbles for details: sector, turnover, z-scores, %volume, and more.
⸻
❓ Frequently Asked Questions
Q: Why do I only see 5 bubbles?
A: You're using Bubble Chart Lite. The full version shows up to 39 bubbles simultaneously for complete market breadth..
To get access:
Find the "Bubble Chart" (invite-only) indicator on TradingView
Read the description for access instructions
Or visit my TradingView profile for details
Q: Can I customize which tickers appear?
A: The indicator automatically selects the most relevant tickers based on the current chart's symbol and the friends algorithm. This ensures you're seeing context, not random stocks.
Q: What timeframe should I use?
A: Any timeframe works. The chart adapts: - Intraday = today's performance - Daily = week-to-date - Weekly = month-to-date - Monthly = year-to-date
Q: How often does the friends list update?
A: Friends relationships are recalculated periodically as ETF holdings change (once every 3 months). The relationships are stable enough that daily changes are minimal.
Q: Does this work on crypto/forex?
A: Currently optimized for US equities and ETFs. Other asset classes may show limited friends data.
Q: The chart looks cluttered. Help?
A: Start with Y-axis: None and Bubble Size: Market Cap. You can also choose to pick less number of bubbles which will clear up the chart
⸻
The Bubble Chart is a market topology engine that visualizes participation, conviction, volatility, and sentiment in real time.
Whether you’re scanning morning momentum, identifying exhausted moves, or exploring ETF ecosystems, it gives you a spatial view of where the action really is.
