OPEN-SOURCE SCRIPT
ICT Premium/Discount Zones [Eˣ]
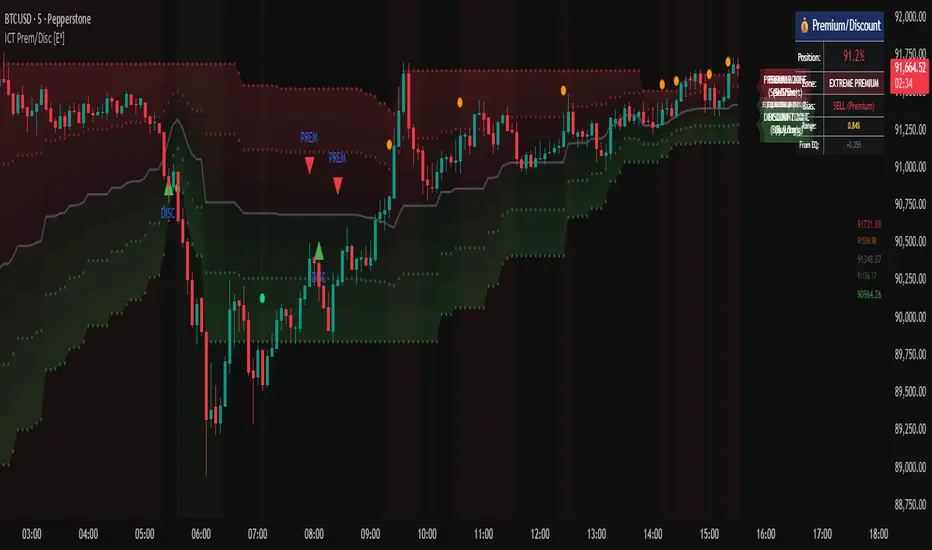
💰 Premium/Discount Zones - Free Indicator
Overview
Premium/Discount Zones automatically identifies where price is "expensive" (premium) versus "cheap" (discount) relative to recent price action. Based on ICT (Inner Circle Trader) concepts, this indicator helps you follow the golden rule of trading: "Buy Discount, Sell Premium" - just like institutions do. Know at a glance whether you should be looking for longs, shorts, or staying flat.
━━━━━━━━━━━━━━━━━━━━━━━━━━━━
🎯 What This Indicator Does
Identifies Value Zones:
• 🔴 [color=red]Premium Zone (50%-100%)[/color] - Price above fair value = SELL/SHORT zone
• 🟢 [color=green]Discount Zone (0%-50%)[/color] - Price below fair value = BUY/LONG zone
• ⚖️ Equilibrium (50%) - Fair value center line
• Dynamic calculation based on recent swing range
Zone Classification:
• Extreme Premium (75-100%): Very expensive, strong sell zone
• Premium (61.8-75%): Expensive, sell zone
• Slight Premium (50-61.8%): Slightly expensive, weak sell
• Slight Discount (38.2-50%): Slightly cheap, weak buy
• Discount (25-38.2%): Cheap, buy zone
• Extreme Discount (0-25%): Very cheap, strong buy zone
Professional Features:
• Real-Time Position Tracking - Shows exact percentage (0-100%)
• Beautiful Gradient Visualization - Darker = more extreme
• Key Fibonacci Levels - 25%, 50%, 75%, and golden ratios
• Trading Bias - Clear BUY/SELL/NEUTRAL guidance
• Price Labels - All key levels labeled on chart
• Multiple Visual Styles - Gradient, Solid, or Lines Only
Statistics Panel:
• Current position percentage
• Current zone classification
• Trading bias (BUY/SELL/NEUTRAL)
• Range size
• Distance from equilibrium
━━━━━━━━━━━━━━━━━━━━━━━━━━━━
📚 Understanding Premium/Discount Concept
What Are Premium/Discount Zones?
Think of the market like a store with sales:
• Discount Zone (0-50%): Items on sale - BUY here
• Premium Zone (50-100%): Full price or more - SELL here
• Equilibrium (50%): Fair price - the reference point
The ICT Concept:
Price operates in ranges between swing highs and lows. Within any range:
• The bottom half (0-50%) = Discount = Buy zone
• The top half (50-100%) = Premium = Sell zone
• The middle (50%) = Equilibrium = Fair value
Why This Works:
• Institutional Behavior: Smart money buys discount, sells premium
• Value Principle: Buy low, sell high - but relative to current range
• Mean Reversion: Price tends to return to equilibrium
• Probability: Longs from discount have higher success rate
• Risk/Reward: Better R:R when buying discount, selling premium
Real-World Example:
Imagine BTC trading between $40,000 (low) and $50,000 (high):
• $40,000 - $45,000 = Discount (buy zone) 🟢
• $45,000 = Equilibrium (fair value) ⚖️
• $45,000 - $50,000 = Premium (sell zone) 🔴
If price is at $42,000 (40% position) = Deep discount = Look for LONGS
If price is at $48,000 (80% position) = Extreme premium = Look for SHORTS
━━━━━━━━━━━━━━━━━━━━━━━━━━━━
🎓 The Six Value Zones Explained
Extreme Discount (0-25%)
• What It Means: Price at "rock bottom" of current range
• Institutional Action: Heavy accumulation (buying)
• Your Action: STRONG BUY - Highest probability longs
• Strategy: Aggressive long entries, avoid shorts
• Target: Equilibrium minimum, premium zone ideal
• Stop: Below recent swing low
• Win Rate: 70-80% for long setups
Discount (25-38.2%)
• What It Means: Price is "on sale" but not extreme
• Institutional Action: Moderate accumulation
• Your Action: BUY - Good long opportunities
• Strategy: Long entries with confirmation
• Target: Equilibrium or premium
• Win Rate: 65-75% for longs
Slight Discount (38.2-50%)
• What It Means: Price approaching fair value from below
• Institutional Action: Light buying, some profit-taking
• Your Action: CAUTIOUS BUY - Lower conviction
• Strategy: Only take best setups, tight stops
• Target: Premium zone
• Win Rate: 55-65% for longs
Slight Premium (50-61.8%)
• What It Means: Price above fair value but not extreme
• Institutional Action: Light selling, some buying still
• Your Action: CAUTIOUS SELL - Lower conviction
• Strategy: Take profits on longs, consider shorts
• Target: Equilibrium or discount
• Win Rate: 55-65% for shorts
Premium (61.8-75%)
• What It Means: Price is "expensive" but not extreme
• Institutional Action: Moderate distribution (selling)
• Your Action: SELL - Good short opportunities
• Strategy: Short entries with confirmation
• Target: Equilibrium or discount
• Win Rate: 65-75% for shorts
Extreme Premium (75-100%)
• What It Means: Price at "top" of current range
• Institutional Action: Heavy distribution (selling)
• Your Action: STRONG SELL - Highest probability shorts
• Strategy: Aggressive short entries, avoid longs
• Target: Equilibrium minimum, discount ideal
• Stop: Above recent swing high
• Win Rate: 70-80% for short setups
━━━━━━━━━━━━━━━━━━━━━━━━━━━━
📊 How To Use This Indicator
Strategy 1: Pure Premium/Discount Trading
Best For: Swing trading, range-bound markets
Timeframes: 1H, 4H, Daily
Win Rate: 65-75%
Rules:
1. Wait for price to reach extreme zones (<25% or >75%)
2. Look for reversal confirmation (pin bar, engulfing, etc.)
3. Enter in direction back toward equilibrium
4. Stop: Beyond extreme zone
5. Target 1: Equilibrium (50%)
6. Target 2: Opposite extreme zone
7. Exit all at target 2
Example - Long from Discount:
• Price drops to 20% (extreme discount)
• Bullish pin bar forms
• Enter long at 22%
• Stop at 15%
• Target 1: 50% (take 50% profit)
• Target 2: 75%+ (exit remaining)
Strategy 2: Trend + Premium/Discount
Best For: Trading with higher timeframe trend
Timeframes: Combine Daily trend + 1H entries
Win Rate: 70-80%
Rules:
1. Identify higher timeframe trend (Daily/4H)
2. If uptrend: Only take longs from discount zones
3. If downtrend: Only take shorts from premium zones
4. Enter when price reaches discount/premium in trend direction
5. Stop: Beyond zone
6. Target: Previous high/low
Why It Works: Entering with trend + at value = highest probability
Strategy 3: Equilibrium Rejection
Best For: Quick scalps, day trading
Timeframes: 5min, 15min, 1H
Win Rate: 60-70%
Rules:
1. Price approaches equilibrium (50%)
2. Watch for rejection (immediate reversal)
3. If rejected from below: Enter short (premium target)
4. If rejected from above: Enter long (discount target)
5. Stop: 10-20 pips beyond equilibrium
6. Target: Next major zone (25% or 75%)
Why It Works: Equilibrium acts as magnet and barrier
Strategy 4: Multi-Timeframe Confluence
Best For: Position trading, high conviction trades
Timeframes: Combine Weekly + Daily + 4H
Win Rate: 75-85%
Rules:
1. Check all three timeframes
2. Look for alignment: All in discount OR all in premium
3. If all in discount: STRONG LONG setup
4. If all in premium: STRONG SHORT setup
5. Enter on lowest timeframe
6. Stop: Below/above lowest TF zone
7. Target: Opposite zone on highest TF
Why It Works: Timeframe alignment = institutional consensus
Strategy 5: Order Block + Premium/Discount
Best For: ICT/SMC traders
Timeframes: 15min, 1H, 4H
Win Rate: 75-85%
Rules:
1. Identify Order Block in discount zone (or premium for shorts)
2. Wait for price to reach the OB
3. Confluence of OB + discount = SUPER SETUP
4. Enter on OB test
5. Stop: Beyond OB
6. Target: Premium zone (or discount for shorts)
Why It Works: Double institutional concept = maximum probability
━━━━━━━━━━━━━━━━━━━━━━━━━━━━
⚙️ Settings Explained
Core Settings
Range Detection Length (Default: 50)
• Lookback period for calculating swing high/low
• Lower (20-30): More reactive, follows recent swings
• Higher (100-200): Slower, shows bigger picture range
• Day Trading: 30-50 bars
• Swing Trading: 50-100 bars
• Position Trading: 100-200 bars
• Recommended: 50 for most styles
Display Settings
Show Premium/Discount Zone
• Toggle each zone on/off independently
• Customize colors for each zone
• Tip: Use contrasting colors to your chart theme
Show Equilibrium (50%)
• Toggle the center fair value line
• Most important reference line
• Recommended: Keep ON
Zone Style (Default: Gradient)
• Gradient: Beautiful color gradients, darker at extremes
• Solid: Simple solid boxes
• Lines Only: Minimal lines at key levels only
• Gradient looks best for most charts
Extend to Right
• Projects zones into future bars
• Helpful for planning entries
• Recommended: ON
Additional Levels
Show Key Fib Levels (Default: ON)
• Displays 25% and 75% levels
• These mark extreme discount/premium boundaries
• Critical levels for entries
• Recommended: Keep ON
Show 61.8% / 38.2% (Default: OFF)
• Golden ratio Fibonacci levels
• Additional confluence points
• Can make chart busier
• Use if you trade Fibonacci
Show Zone Labels (Default: ON)
• Displays "PREMIUM ZONE" and "DISCOUNT ZONE" text
• Helpful for learning
• Turn OFF after you're familiar with the zones
Show Price Labels (Default: ON)
• Shows exact prices at key levels
• Appears on right side of chart
• Very useful for setting orders
━━━━━━━━━━━━━━━━━━━━━━━━━━━━
📱 Info Panel Guide
Position (%)
• Shows where price is in the range (0-100%)
• 0% = Bottom of range (extreme discount)
• 50% = Middle (equilibrium)
• 100% = Top of range (extreme premium)
• This is your primary reference number
Zone
• Text description of current position
• 6 possible zones from Extreme Discount to Extreme Premium
• Color-coded for quick reading
• Tells you immediately: should I buy or sell?
Bias
• Simple trading guidance
• BUY (Discount): Position <40% - Look for longs
• SELL (Premium): Position >60% - Look for shorts
• NEUTRAL: Position 40-60% - Be selective
• Follow the bias for highest probability
Range
• Current range size as % of price
• Larger range = More volatility = More opportunity
• Smaller range = Less volatility = Tighter zones
• Example: 5% range = decent volatility
From EQ
• Distance from equilibrium
• Positive (+) = Above equilibrium (premium side)
• Negative (-) = Below equilibrium (discount side)
• Quick reference for mean reversion trades
━━━━━━━━━━━━━━━━━━━━━━━━━━━━
📱 Alert Setup
This indicator includes 5 alert types:
1. Entering Discount Zone
• Fires when price crosses below 50% (equilibrium)
• Action: Start looking for long setups
• Market moving into buy zone
2. Entering Premium Zone
• Fires when price crosses above 50% (equilibrium)
• Action: Start looking for short setups
• Market moving into sell zone
3. Extreme Discount
• Fires when price crosses below 25%
• Action: STRONG BUY opportunity
• Highest probability long setups
4. Extreme Premium
• Fires when price crosses above 75%
• Action: STRONG SELL opportunity
• Highest probability short setups
5. Equilibrium Touch
• Fires when price touches 50% level
• Action: Watch for rejection/breakthrough
• Key decision point
To Set Up Alerts:
1. Click "Alert" button (clock icon)
2. Select "Premium/Discount Zones"
3. Choose your alert type
4. Configure notification method
5. Click "Create"
Pro Tip: Set "Extreme Discount" and "Extreme Premium" alerts for best setups
━━━━━━━━━━━━━━━━━━━━━━━━━━━━
💎 Pro Tips & Best Practices
✅ DO:
• Buy discount, sell premium - The golden rule, simple but effective
• Wait for extremes - Best trades at <25% or >75%
• Use confirmation - Price action, structure, patterns
• Check higher timeframes - HTF discount = strongest longs
• Follow the bias - Indicator tells you: buy, sell, or wait
• Target equilibrium minimum - Always a safe first target
• Scale positions - Bigger size at extreme discount/premium
• Be patient - Wait for price to reach value zones
⚠️ DON'T:
• Don't fade the zone blindly - Always wait for confirmation
• Don't buy premium - Longs from premium have low win rate
• Don't sell discount - Shorts from discount have low win rate
• Don't ignore equilibrium - 50% is critical magnet/barrier
• Don't fight strong trends - Trend can stay in premium/discount longer
• Don't use tight stops - Allow room within the zone
• Don't overtrade neutral - 40-60% range has lower probability
• Don't ignore timeframe alignment - Multi-TF confluence matters
🎯 Best Timeframes:
• Scalping: 5min, 15min (quick moves between zones)
• Day Trading: 15min, 1H (balanced view)
• Swing Trading: 1H, 4H, Daily (major value zones)
• Position Trading: Daily, Weekly (institutional value)
🔥 Best Markets:
• Excellent: Ranging markets, consolidations
• Good: Trending markets (use with HTF trend)
• Best Instruments: Forex, Indices, BTC, ETH (clean ranges)
• Moderate: Stocks (gaps can distort zones)
⏰ When It Works Best:
• Range-bound markets (oscillates between premium/discount)
• Trending markets (pullbacks to discount/premium)
• After breakouts (new range forms, new zones)
• High-volume sessions (London/NY)
━━━━━━━━━━━━━━━━━━━━━━━━━━━━
🎓 Advanced Premium/Discount Concepts
The Equilibrium Magnet
Price is constantly drawn to equilibrium (50%):
• From discount → Moves toward equilibrium (target)
• From premium → Moves toward equilibrium (target)
• At equilibrium → Decides next direction
• Trading: Always target equilibrium minimum on trades
Mean Reversion Principle
The further from equilibrium, the stronger the pull back:
• 90% position → Very high probability of drop toward 50%
• 10% position → Very high probability of rise toward 50%
• Trading: Extreme zones offer best risk/reward
Nested Ranges (Multi-Timeframe)
Larger TF range contains smaller TF ranges:
• Daily range: $40k - $50k (you're at 80% = daily premium)
• 1H range: $48k - $50k (you're at 20% = 1H discount)
• Conflict: Daily says sell, 1H says buy
• Solution: Higher timeframe wins - be cautious on longs
Range Expansion vs Contraction
• Expanding Range: High volatility, larger zones
• Contracting Range: Low volatility, smaller zones
• Trading: Best trades during range expansion
• Watch for breakouts when range contracts too much
Premium/Discount + Fair Value Gaps
When FVG appears in discount zone:
• Bullish FVG in discount = SUPER BUY setup
• Bearish FVG in premium = SUPER SELL setup
• Win Rate: 75-85% (double institutional concepts)
Equilibrium Rejection Strategy
50% level acts as support/resistance:
• Strong rejection from equilibrium = trend continuation
• Multiple tests of equilibrium = preparation for breakout
• Breakthrough equilibrium = trend reversal possible
━━━━━━━━━━━━━━━━━━━━━━━━━━━━
📈 Common Premium/Discount Patterns
Pattern 1: The Perfect Swing
• Price in extreme discount (15%)
• Reversal pattern forms
• Clean move to premium (85%)
• Textbook trade, 70%+ win rate
Pattern 2: The Equilibrium Rejection
• Price approaches 50% from below
• Gets rejected, can't break through
• Returns to discount
• 50% acts as resistance
Pattern 3: The Range Expansion
• Price breaks above old range high
• New premium zone forms at higher level
• Old premium becomes new discount
• Adjust to new range
Pattern 4: The False Premium
• Price briefly enters premium (55%)
• Immediately rejected back to discount
• "Fakeout" or stop hunt
• Actually still discount trade
Pattern 5: The Trend Extension
• Strong trend keeps price in premium for extended time
• Doesn't mean reversal imminent
• Wait for actual reversal signals
• Trend can override value zones
━━━━━━━━━━━━━━━━━━━━━━━━━━━━
🚀 What Makes This Different?
Unlike basic support/resistance, Premium/Discount Zones:
• ICT Methodology - Based on institutional value concepts
• Dynamic Calculation - Always relative to current range
• Clear Trading Bias - Know instantly: buy, sell, or wait
• Beautiful Visualization - Gradient shows intensity
• Multiple Styles - Gradient, solid, or lines
• Real-Time Tracking - Exact position percentage
• Multi-Level System - 6 zones from extreme to extreme
• Simple Yet Powerful - One rule: buy discount, sell premium
Based On Professional Concepts:
• ICT Premium/Discount theory
• Market value principles
• Mean reversion dynamics
• Institutional accumulation/distribution
• Fair value seeking behavior
━━━━━━━━━━━━━━━━━━━━━━━━━━━━
📈 Expected Performance
Based on ICT concepts and trading observations:
Win Rates by Zone:
• Extreme Discount (0-25%) longs: 70-80%
• Discount (25-40%) longs: 65-75%
• Neutral (40-60%) either direction: 50-60%
• Premium (60-75%) shorts: 65-75%
• Extreme Premium (75-100%) shorts: 70-80%
Risk/Reward by Zone:
• Extreme zones: Typically 1:3 to 1:5 R:R
• Standard zones: Typically 1:2 to 1:3 R:R
• Neutral zones: Typically 1:1 to 1:2 R:R
Best Practices:
• Only trade extreme zones (<25%, >75%) = Highest win rate
• Target equilibrium minimum = Always safe
• Use with trend = Add 10-15% to win rate
• Combine with OB/FVG = Add 15-20% to win rate
• Wait for confirmation = Essential
Common Failures:
• Strong trends ignore value zones (20-30% of time)
• Equilibrium can act as barrier instead of target
• Range breakouts invalidate current zones
• Low volatility = zones too tight to trade
━━━━━━━━━━━━━━━━━━━━━━━━━━━━
📈 Upgrade Your Trading Arsenal
This free indicator shows you market value like institutions see it. Want more?
🔥 Check out my premium scripts for:
• Automated Premium/Discount strategies with entries/exits
• Combined Premium/Discount + Order Block + FVG systems
• Multi-timeframe value analysis
• Complete ICT/SMC trading solutions
• Backtested performance tracking
• And much more...
👉 Visit my profile to trade value like the pros!
━━━━━━━━━━━━━━━━━━━━━━━━━━━━
📝 Important Notes
• Premium/Discount is relative to CURRENT range, not absolute
• Ranges change - zones recalculate as new highs/lows form
• Strong trends can stay in premium/discount longer than expected
• Always use confirmation - don't fade zones blindly
• Equilibrium (50%) is the most important reference line
• Best trades at extremes (<25% or >75%)
• Combine with structure, patterns, and risk management
• Works best in ranging and trending pullback scenarios
• Practice identifying value zones before live trading
Learning Curve:
• Week 1: Understand the 6 zones and bias
• Week 2: Practice identifying extreme zones
• Week 3-4: Combine with price action confirmation
• Month 2+: Integrate with Order Blocks and FVGs
Disclaimer: For educational purposes. Premium/Discount trading requires practice. Always use proper risk management.
━━━━━━━━━━━━━━━━━━━━━━━━━━━━
🙏 Support This Work
If this indicator helps you buy discount and sell premium:
• ⭐ Give it a thumbs up
• 💬 Share your best value trades in comments
• 🔔 Follow for more free ICT/SMC tools
• 🚀 Share with traders learning smart money concepts
Questions about Premium/Discount? Drop a comment!
━━━━━━━━━━━━━━━━━━━━━━━━━━━━
Developed with ❤️ for traders who understand the golden rule: Buy Discount, Sell Premium
━━━━━━━━━━━━━━━━━━━━━━━━━━━━
Version History
• v1.0 - Initial release with dynamic range calculation and gradient visualization
Script de código aberto
Em verdadeiro espírito do TradingView, o criador deste script o tornou de código aberto, para que os traders possam revisar e verificar sua funcionalidade. Parabéns ao autor! Embora você possa usá-lo gratuitamente, lembre-se de que a republicação do código está sujeita às nossas Regras da Casa.
Market Solver Pro: The automated system for disciplined traders. Includes: Trend Validation, Entries, and Risk Management. 📉 Stop Guessing. 📈 Start Executing.
Get the Signals & Free Guides:
➡️ patreon.com/marketsolverpro
Get the Signals & Free Guides:
➡️ patreon.com/marketsolverpro
Aviso legal
As informações e publicações não se destinam a ser, e não constituem, conselhos ou recomendações financeiras, de investimento, comerciais ou de outro tipo fornecidos ou endossados pela TradingView. Leia mais nos Termos de Uso.