OPEN-SOURCE SCRIPT
Atualizado 1m Scalping ATR (with SL & Zones)
A universal ATR indicator that anchors volatility to your stop-loss.
Read any market (FX, JPY pairs, Gold/Silver, indices, crypto) consistently—regardless of pip/point conventions and timeframe.
Why this indicator?
Classic ATR is absolute (pips/points) and feels different across markets/TFs. ATR Takeoff normalizes ATR to your stop-loss in pips and highlights clear zones for “quiet / ideal / too volatile,” so you instantly know if a 10-pip SL fits current conditions.
Key features
Auto pip detection (FX, JPY, XAU/XAG, indices, BTC/ETH).
Selectable ATR source: chart timeframe or fixed ATR TF (e.g., “15”, “30”, “60”).
Display modes:
Percent of SL – ATR relative to SL in %, great for M1 (typical 10–30%).
Multiple of SL – ATR as a multiple of SL (e.g., 0.6× / 1.0× / 1.2×).
Panel zones:
Green = “Ready for takeoff” (≤ Low), Yellow = reference (Mid), Red = too volatile (≥ High).
Status badge (top-right): Quiet / ATR ok / Wild, current ATR/SL value, ATR TF used.
Direction-agnostic: Works the same for longs and shorts.
Inputs (at a glance)
Length / Smoothing (RMA/SMA/EMA/WMA): ATR base settings.
Your Stop-Loss (Pips): Reference SL (e.g., 10).
ATR Timeframe (empty = chart): Use chart TF or a fixed TF.
Display Mode: “Percent of SL” or “Multiple of SL.”
Low/Mid/High (Percent Mode): Zone thresholds in % of SL.
Low/Mid/High (Multiple Mode): Zone thresholds in ×SL.
Recommended defaults
Length 14, Smoothing RMA, SL 10 pips
Display Mode: Percent of SL
Low/Mid/High (%): 15 / 20 / 25
ATR Timeframe: empty (= chart) for reactive, or “30” for smoother M30 context with M1 entries.
How to use
Set SL (pips). 2) Choose display mode. 3) Optionally pick ATR TF.
Interpretation:
≤ Low (green): setups allowed.
≈ Mid (yellow): neutral reference.
≥ High (red): too volatile → adjust SL/size or wait.
Note: Auto-pip relies on common ticker naming; verify on exotic symbols.
Disclaimer: For research/education. Not financial advice.
Notas de Lançamento
ATR Takeoff+ (v2.0) — SL-Anchored ATR for FX & CryptoWhat it is
ATR Takeoff+ turns the classic ATR into an actionable, *stop-loss–anchored* volatility gauge that stays consistent across markets and timeframes.
* **Forex mode:** You define your stop distance in **pips** (default **15 pips**).
* **Crypto mode:** You define your stop distance as **% of entry** (default **5%**).
* The indicator converts ATR to the same unit and compares it to your SL, giving you **uniform zones**:
* 🟩 **Ready Zone** (≤ Low) – conditions are suitable for your default SL
* 🟨 **Mid** – neutral reference
* 🟥 **High** (≥ High) – too volatile for your default SL
Whenever you change your SL (pips or %), the **green band and the yellow/red lines update instantly**.
---
Why it helps
* **Consistency:** Judge volatility relative to *your* risk, not absolute values.
* **Cross-market:** FX and Crypto “feel” the same despite different price scales.
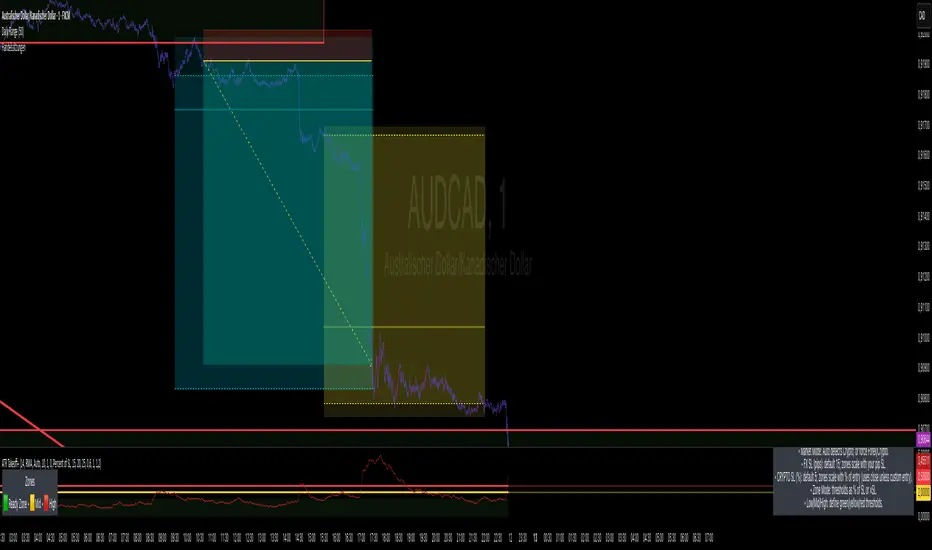
* **Fast decisions:** A compact badge shows state (**ATR ok / Neutral / Too volatile**), market type (FOREX/CRYPTO), and current ATR (in pips for FX, price units for Crypto).
---
How it works (under the hood)
* **ATR core:** Standard TR smoothed by your chosen MA (RMA/SMA/EMA/WMA; default RMA, length 14).
* **FX:** ATR is converted to **pips** using symbol conventions (incl. JPY, metals/indices heuristics).
* **Crypto:** Your SL% × entry (close or optional custom entry) → **absolute price distance**. ATR is compared to that distance.
* **Zones:** You can define thresholds as **% of SL** (intuitive) or **×SL** (multiples).
---
Inputs (key settings)
* **ATR Lookback (bars)** – ATR period (default 14).
* **ATR MA Type** – RMA/SMA/EMA/WMA (default RMA).
* **Market Mode** – *Auto* (detects common crypto tickers) or force **Forex/Crypto**.
* **FX: Stop-Loss (Pips)** – Your standard SL in pips (default **15**).
* **CRYPTO: Stop-Loss % of Entry** – Your SL as % (default **5**).
* **CRYPTO: Use custom entry price? / Custom entry** – Fix the entry price for exact SL distance; otherwise close is used.
* **Zone Mode** – **Percent of SL** or **Multiple of SL**.
* **Low / Mid / High** – Thresholds for the green band top, yellow reference, and red limit.
* **Show legend / Show Help Panel** – Small on-chart guides.
**Tip:** Start with **Percent of SL** and thresholds **15 / 20 / 25%**. For multiples, try **0.60× / 1.00× / 1.20×**.
---
Recommended workflow
1. Set your baseline SL (FX pips or Crypto %).
2. Choose **Zone Mode** and threshold style that matches your management.
3. Trade your setup **only when ATR ≤ Low** (green band), be cautious around **Mid**, stand down or adapt risk when **ATR ≥ High**.
---
Notes & limitations
*Symbol heuristics for pips are sensible defaults; exotic symbols may need manual judgment.
*Indicator is **direction-agnostic**; combine with your entry model (breakout/structure/FVG/OB, sessions, etc.).
**Disclaimer:** For research/education only. Not financial advice. Always manage risk.
Script de código aberto
Em verdadeiro espírito do TradingView, o criador deste script o tornou de código aberto, para que os traders possam revisar e verificar sua funcionalidade. Parabéns ao autor! Embora você possa usá-lo gratuitamente, lembre-se de que a republicação do código está sujeita às nossas Regras da Casa.
Aviso legal
As informações e publicações não se destinam a ser, e não constituem, conselhos ou recomendações financeiras, de investimento, comerciais ou de outro tipo fornecidos ou endossados pela TradingView. Leia mais nos Termos de Uso.