📊 Trade Breakdown:
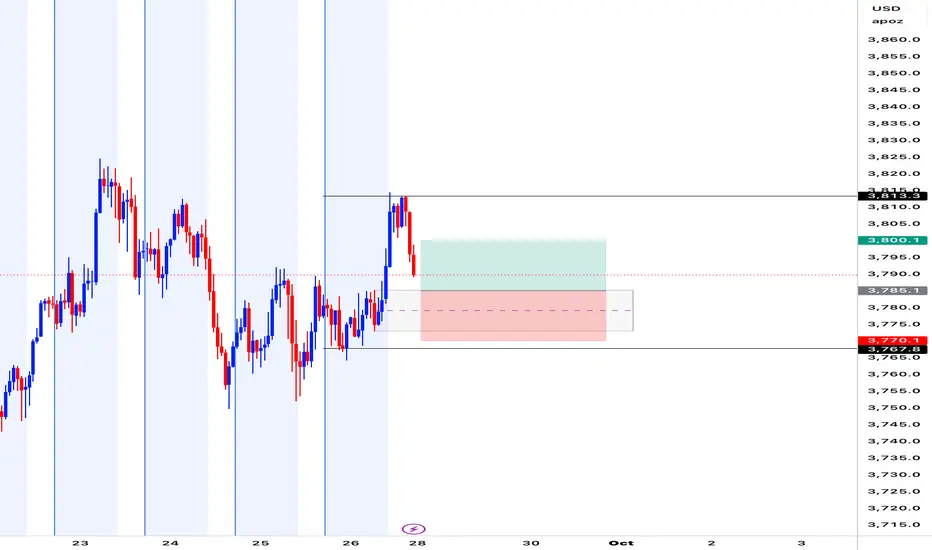
Pair: Gold Futures (MGC1!)
Timeframe: 1 Hour
Bias: Bullish
Type: Demand Zone Retest
Entry: Waiting for bullish engulfing confirmation
Stop Loss: Below 3770 demand zone
Take Profit:
• TP1: 3785
• TP2: 3813
Risk-to-Reward: ~1:2–1:3 depending on entry, but the overall target is 1:1!
⸻
📌 Key Confluences:
• Price broke previous structure high, confirming momentum shift
• Fresh 1H demand zone left behind after breakout
• Waiting for retest + signs of rejection before executing
• Bullish engulfing candle will be my trigger
• Trend bias still showing strength intraday
⸻
⚙️ Trade Setup:
Plan is to let price come back into demand, reject cleanly and print a bullish engulfing candle. That’s when I’ll look to execute long. Stop will be tucked below the zone around 3770 to keep risk defined. First target set at 3785 (recent structure) with extended target at 3813 (previous high/supply zone).
If the zone fails or no bullish confirmation shows, the setup is invalid and I stay flat.
⸻
🧠 Mindset:
Patience is everything. I’d rather wait for price to come back to me than force a trade. No FOMO. Clean invalidation, clean R:R. Confidence comes from the structure break and demand zone. Trusting the process and letting the trade play out on my terms.
“Trade Simple, Live Lavish”
Aviso legal
The information and publications are not meant to be, and do not constitute, financial, investment, trading, or other types of advice or recommendations supplied or endorsed by TradingView. Read more in the Terms of Use.
Aviso legal
The information and publications are not meant to be, and do not constitute, financial, investment, trading, or other types of advice or recommendations supplied or endorsed by TradingView. Read more in the Terms of Use.