TrendMaster Pro 2.3 with Alerts
Hello friends,
A member of the community approached me and asked me how to write an indicator that would achieve a particular set of goals involving comprehensive trend analysis, risk management, and session-based trading controls. Here is one example method of how to create such a system:
Core Strategy Components
Multi-Moving Average System - Uses configurable MA types (EMA, SMA, SMMA) with short-term (9) and long-term (21) periods for primary signal generation through crossovers
Higher Timeframe Trend Filter - Optional trend confirmation using a separate MA (default 50-period) to ensure trades align with broader market direction
Band Power Indicator - Dynamic high/low bands calculated using different MA types to identify price channels and volatility zones
Advanced Signal Filtering
Bollinger Bands Volatility Filter - Prevents trading during low-volatility ranging markets by requiring sufficient band width
RSI Momentum Filter - Uses customizable thresholds (55 for longs, 45 for shorts) to confirm momentum direction
MACD Trend Confirmation - Ensures MACD line position relative to signal line aligns with trade direction
Stochastic Oscillator - Adds momentum confirmation with overbought/oversold levels
ADX Strength Filter - Only allows trades when trend strength exceeds 25 threshold
Session-Based Trading Management
Four Trading Sessions - Asia (18:00-00:00), London (00:00-08:00), NY AM (08:00-13:00), NY PM (13:00-18:00)
Individual Session Limits - Separate maximum trade counts for each session (default 5 per session)
Automatic Session Closure - All positions close at specified market close time
Risk Management Features
Multiple Stop Loss Options - Percentage-based, MA cross, or band-based SL methods
Risk/Reward Ratio - Configurable TP levels based on SL distance (default 1:2)
Auto-Risk Calculation - Dynamic position sizing based on dollar risk limits ($150-$250 range)
Daily Limits - Stop trading after reaching specified TP or SL counts per day
Support & Resistance System
Multiple Pivot Types - Traditional, Fibonacci, Woodie, Classic, DM, and Camarilla calculations
Flexible Timeframes - Auto-adjusting or manual timeframe selection for S/R levels
Historical Levels - Configurable number of past S/R levels to display
Visual Customization - Individual color and display settings for each S/R level
Additional Features
Alert System - Customizable buy/sell alert messages with once-per-bar frequency
Visual Trade Management - Color-coded entry, SL, and TP levels with fill areas
Session Highlighting - Optional background colors for different trading sessions
Comprehensive Filtering - All signals must pass through multiple confirmation layers before execution
This approach demonstrates how to build a professional-grade trading system that combines multiple technical analysis methods with robust risk management and session-based controls, suitable for algorithmic trading across different market sessions.
Good luck and stay safe!
Join TradingView and get $15 towards any subscription!
Indicadores e estratégias

Buy/Sell Strategy with EMA 200, Hull, MACDupdated Short Description:
The "Trend Surfer" Pine Script is your ultimate tool for catching and riding the waves of market trends. It masterfully combines the lightning-fast trend identification of the Hull Suite, the steadfast long-term direction from the 200 Moving Average, and the precise momentum shifts of MACD crossovers, helping you to "surf" market trends with confidence.
Full Description:
Overview:
Ever dreamed of effortlessly riding the market's biggest waves? The "Trend Surfer" script is engineered precisely for that. By integrating the Hull Moving Average (HMA) Suite, the 200-period Simple Moving Average (SMA), and the Moving Average Convergence Divergence (MACD), this script offers a sophisticated yet intuitive approach to trend trading. Its core strength lies in its ability to identify confluence – ensuring that multiple, robust indicators align perfectly before signaling a trade. This multi-layered confirmation system acts like a powerful filter, allowing you to focus on high-probability trend-following opportunities and avoid choppy waters.

Supply/Demand Zones + Engulfment-based ExecutionSupply/Demand Zones + Engulfment-Based Execution
Strategy Overview
This strategy combines institutional trading concepts—supply/demand zones and engulfing candle patterns—to generate high-probability long and short trade setups. The system uses aggregated price action to identify potential reversal zones and confirms entries with engulfing candle patterns, ensuring trades are only taken when market structure shows commitment in the direction of the trade.
Core Concepts
• Supply & Demand Zones: These are automatically detected by analyzing aggregated bullish and bearish candle structures over user-defined intervals. Supply zones are formed after bearish continuation patterns; demand zones appear after bullish continuation patterns.
• Engulfing Entries: Once price enters a zone, the strategy waits for a bullish engulfing pattern (in a demand zone) or a bearish engulfing pattern (in a supply zone) before executing a trade. This adds confirmation and reduces false signals.
• Risk Management: Stop-loss is placed at the low (for long trades) or high (for short trades) of the engulfed candle. Take-profit can be calculated using a fixed R-multiple (risk-to-reward ratio) or a user-defined target price.
Key Features
Fully customizable aggregation factor for zone detection
Visual zone boxes, entry/SL/TP boxes, and engulfing pattern labels
Optional removal of mitigated zones for cleaner charting
Configurable trade mode (Long only, Short only, or Both)
Support for trading sessions and date filtering
Alerts for price entering supply or demand zones
How to Use
Select Aggregation Factor: Choose how many candles to group together for identifying key zones (e.g., 4x timeframe).
Enable Zones: Turn on supply and/or demand zones as needed.
Set Execution Parameters:
– Choose R-multiple (e.g., 2:1 risk-reward)
– Or use a fixed take-profit price
Define Trade Time Window:
– Set the date and time ranges to restrict execution
– Use Start Hour and End Hour to limit trades to specific sessions (e.g., London/New York)
Run on Desired Timeframe: Typically used on 15m–4H charts, depending on your strategy and the asset’s volatility.
Ideal For
• Traders using Smart Money Concepts (SMC)
• Those who value high-confluence entries
• Intraday to swing traders looking for structure-based automation
⚠️ Important Notes
• The strategy requires engulfing confirmation within the zone to enter a position.
• This script does not repaint and executes trades on a bar close basis.
• Backtest results may vary based on session filters and aggregation factor.
© Attribution
This strategy was developed by The_Forex_Steward and is licensed under the Mozilla Public License 2.0.
You are free to use, modify, and distribute it under the terms of that license.

EMA Crossover + RSI Filter with ATR StopsCore Concept & Logic:
This strategy utilizes a powerful combination of Exponential Moving Average (EMA) crossovers and Relative Strength Index (RSI) filters for signal validation. It includes dynamic risk management by setting Take-Profit and Stop-Loss targets based on the Average True Range (ATR).
How It Works & Signal Interpretation:
EMA Crossovers: A bullish signal is generated when the faster EMA (20-period default) crosses above the slower EMA (50-period default), indicating upward momentum. A bearish signal occurs when the fast EMA crosses below the slow EMA.
RSI Filter: Ensures entries aren't made during extreme market conditions (avoids longs when RSI > 70, avoids shorts when RSI < 30).
ATR-Based Stops: Automatically calculates realistic Stop-Loss and Take-Profit targets, helping manage risk relative to recent volatility.
Key Input Parameters:
Fast EMA Length: Recommended between 10-30 (default 20).
Slow EMA Length: Recommended between 40-100 (default 50).
RSI Length: Typically 14 periods.
RSI Overbought Threshold: 70 (standard RSI practice).
RSI Oversold Threshold: 30 (standard RSI practice).
ATR Length: Typically 14 periods for standard volatility measure.
Stop-Loss Multiplier: Recommended range: 1.5-2.5 (default 1.5).
Take-Profit Multiplier: Recommended range: 2-4 (default 3).
Ideal Usage & Performance Scenarios:
Performs well in trending markets (stocks, crypto, forex).
Potentially weaker during choppy or sideways markets due to false EMA crossovers.
Ideal on timeframes like 1H, 4H, and 1D charts.
Known Limitations & Risks:
EMA strategies can produce false signals in ranging markets.
RSI filter may limit entries in persistently strong trending conditions.
ATR-based stops might not accommodate sudden volatility spikes.
For more such strategies visit stratizone.com where you will get settings as well. The platform also offers to share the strategies and find them easily with lots of filters.
The equity curve is on BTC, 15min

GStrategy with Long & Short WIF 1hThis is a 4-hour chart strategy for cryptocurrency trading, combining RSI-based divergence signals and trend filters. The script identifies bullish and bearish divergences, and executes long and short entries based on RSI levels. It limits holding time per trade, controls risk with stop-loss and take-profit levels, and provides visual markers for entries and exits. The strategy is designed for intraday to swing trading, aiming for consistent small gains with minimal losses.

3 EMA Trend Strategy (Locks Trailing Stop Tightening)3 EMA Trend Strategy (with Trailing Stop Tightening)
This open-source strategy uses three Exponential Moving Averages (7, 21, 35) to detect bullish alignment and trigger long entries during strong upward trends.
* Entry Logic:
A long trade is triggered when EMA 7 > EMA 21 > EMA 35. This alignment signals a confirmed uptrend.
* Exit Logic:
The strategy uses a trailing stop mechanism.
An initial stop (e.g., 10%) follows the high since entry.
Once profit reaches a customizable threshold (e.g., 20%), the trailing stop tightens (e.g., to 5%) to help lock in gains.
* Backtest Settings (default):
Starting capital: $10,000
Commission: 0.1%
Slippage: 1 tick
Position sizing: 100% of equity per trade (can be reduced to lower risk)
* Customization:
All trailing logic and EMA settings are configurable.
Designed for swing trading and adaptable for multiple timeframes.
⚠️ This is for educational purposes only. Always test on different symbols and timeframes before using in live environments.

RSI Trend RiderRSI Trend Rider is a long only, momentum-based trend-following strategy designed for rules based trading. It combines a setup of EMAs (20, 50, 200), RSI(4), ADX filtering, and a daily 120 EMA to capture high-probability long trades in trending markets.
Works best on intraday timeframes (2h, 4h)
Key Features:
Multi-timeframe trend confirmation (EMA alignment + daily EMA)
RSI(4) pullback entries in strong trends
ADX filter to avoid low-momentum conditions
Configurable fixed and EMA-based stop loss/target options
Built-in performance dashboard with key metrics like PnL, drawdown, win rate, and buy & hold comparison (can be turned off on mobile or small screens).
Customizable backtest period and risk settings
Ideal for traders looking for a simple, data-driven system that rides trends and compounds small, consistent wins.

Squeeze Momentum StrategyThe Squeeze Momentum Strategy, adapted from @LazyBear Squeeze Momentum Indicator, is designed for TradingView to capitalize on breakouts from low-volatility periods and momentum shifts, incorporating commissions for realistic trading outcomes.
Indicator Mechanics
Bollinger Bands (BB):
Calculated using a Simple Moving Average (SMA) of the closing price (length=20) and standard deviation (mult=2.0).
Defines volatility bands: upperBB and lowerBB.
Keltner Channels (KC):
Uses an SMA (lengthKC=20) and a multiple of the average true range or high-low range (multKC=1.5).
Defines upperKC and lowerKC to measure volatility.
Squeeze Condition:
Squeeze On (sqzOn): Bollinger Bands inside Keltner Channels (lowerBB > lowerKC and upperBB < upperKC), indicating low volatility (consolidation).
Squeeze Off (sqzOff): Bollinger Bands outside Keltner Channels, signaling a breakout.
No Squeeze (noSqz): Neutral state, neither squeeze nor breakout.
Momentum (val):
Computed using linear regression on the difference between the close price and the SMA of the average of the highest high and lowest low over lengthKC.
Positive val indicates bullish momentum; negative val indicates bearish momentum.
Strategy Rules
Long Entry:
Momentum is positive and increasing (val > 0 and val > val ).
No squeeze (noSqz is true), confirming breakout potential.
Short Entry:
Momentum is negative and decreasing (val < 0 and val < val ).
No squeeze (noSqz is true).
Exits:
Momentum Reversal: Close long when val < 0; close short when val > 0.
Stop-Loss: 2% below/above entry price (stop=strategy.position_avg_price * 0.98 for long, * 1.02 for short).
Take-Profit: 3% above/below entry price (limit=strategy.position_avg_price * 1.03 for long, * 0.97 for short).
Commission:
Set at 0.1% per trade (commission_value=0.1), adjustable in the strategy() call to match broker fees (e.g., 0.075% for Binance, 0.005% for Interactive Brokers).
How It Works
Identifies Low Volatility: sqzOn signals a consolidation period, often preceding a breakout.
Captures Breakouts: Trades are entered when volatility expands (noSqz) with momentum confirmation (val trend).
Manages Risk:
Stop-loss and take-profit ensure a 1:1.5 risk-reward ratio.
Commissions are deducted per trade, impacting net profitability.
Visual Feedback:
Histogram (val): Lime/green for bullish, red/maroon for bearish.
Zero line: Blue (no squeeze), black (squeeze on), gray (squeeze off).
Profitability Factors
Market Fit: Best for trending markets (e.g., BTC/USD, stocks) on higher timeframes (1H, 4H, D) to reduce noise and commission impact.
Commission Impact: 0.1% per trade reduces returns; optimize by lowering commission_value or using higher timeframes.
Parameter Tuning: Adjust length, mult, lengthKC, or multKC to balance signal frequency and accuracy.
Notes
Backtesting: Test in TradingView with your asset/timeframe to verify profitability. Adjust commission_value to match broker fees (e.g., 0.005% for Interactive Brokers).
Risk Management: Limit risk to 1-2% of capital per trade.
Enhancements: Add plotshape for entry/exit signals on the price chart if desired—contact for implementation.
Disclaimer
This strategy is provided for educational and informational purposes only and should not be construed as financial advice or a recommendation to buy or sell any securities. Trading carries significant financial risks, including the potential loss of principal. Past performance is not indicative of future results. Users are strongly advised to conduct thorough backtesting, consult a qualified financial advisor, and fully understand the risks involved before engaging in live trading. The authors and providers of this strategy assume no responsibility for any financial losses incurred.

Scalping+EMA Cross+S/R Zonen+Alerts📜 Description (English)
This script combines multiple powerful trading techniques for scalping strategies on intraday timeframes like 1m, 5m, or 15m:
🔧 Features:
EMA Cross Strategy: Generates long/short entries based on the crossover of fast and slow EMAs.
Automatic S/R Zone Detection: Draws support and resistance zones using pivot highs and lows.
Trend Channels:
Linear trend channel using linear regression.
Parabolic trend channel using quadratic regression.
Labeled Signals & Alerts: Clear "Long" / "Short" labels and alerts for signal and S/R touchpoints.
SL/TP Management: Automatically places stop-loss and take-profit levels with each entry.
✅ Recommended Settings:
Parameter Value Description
Fast EMA 9 More responsive to short-term trend changes
Slow EMA 21 Smoother to confirm trend direction
Pivot Length 10 Sensitive enough to detect key S/R points
Line Length 50 Visible enough on small timeframes
Max Zones 2 Prevents cluttered chart with too many lines
Stop-Loss % 0.5 Tight SL suitable for scalping
Take-Profit % 1.5 Good risk-reward ratio for quick profits
Linear Channel Length 23 Reacts quickly to trend changes
Parabolic Channel Length 70 Smoother for spotting large trend shifts
📊 Best For:Scalping, Daytrading
Volatile markets (Crypto, Forex, Indices)

Enhanced EMA Band Rejection Strategy📈 Enhanced EMA Band Rejection Strategy 🎯
🌟 Revolutionary Trading Approach with Smart Band Recognition
🔥 What Makes This Strategy Unique?
🎪 The Power of EMA Band Rejection - This isn't just another EMA crossover strategy! We've engineered a sophisticated system that identifies high-probability reversal opportunities when price gets rejected from EMA bands, creating explosive momentum moves.
🎯 Core Trading Logic
📊 Dual EMA System (12 & 21)
🟢 Bullish Environment: EMA12 > EMA21 (Green Bands)
🔴 Bearish Environment: EMA12 < EMA21 (Red Bands)
⚡ Trend Consistency: Requires sustained trend direction for configurable bars
🚀 Entry Conditions - Precision Engineered
📈 LONG Setups (Bullish Rejection)
🎯 Price wicks down to touch EMA bands
💪 Strong bullish candle body (body > lower wick)
✂️ Minimal upper wick (< 2% of candle range)
🟢 Close ABOVE both EMAs (breakout confirmation)
🛡️ Previous candle didn't close below lower band
⏰ Consistent bullish trend for required bars
📉 SHORT Setups (Bearish Rejection)
🎯 Price wicks up to touch EMA bands
💪 Strong bearish candle body (body > upper wick)
✂️ Minimal lower wick (< 2% of candle range)
🔴 Close BELOW both EMAs (breakdown confirmation)
🛡️ Previous candle didn't close above upper band
⏰ Consistent bearish trend for required bars
🛡️ Advanced Risk Management
💎 Fixed Risk-Reward Ratio (Default 3:1)
🔴 Stop Loss: Previous candle's high/low
🎯 Take Profit: Automatically calculated based on R:R ratio
📊 Position Sizing: Percentage of equity (default 10%)
🔔 Smart Notification System
🚨 Complete Alert Suite:
🟢 Entry Signals: Instant trade entry notifications
🛑 Exit Alerts: Stop loss and take profit hits
⚠️ Setup Warnings: Potential setups forming
❌ Failed Conditions: Debug failed entries
📱 Mobile Friendly: Formatted for all devices
🎛️ Fully Customizable Parameters
⚙️ Fine-Tune Your Edge:
📏 EMA lengths (default 12/21)
🎯 Risk-reward ratio (1:1 to 10:1)
📊 Maximum wick percentage tolerance
⏳ Trend consistency requirements
🔔 Notification preferences
🧠 Advanced Debugging Features
🔍 Real-Time Analysis Dashboard:
📋 Live condition monitoring table
🎨 Color-coded background alerts
📊 Detailed failure analysis
💡 Previous candle position tracking
🔄 Trend consistency verification
🎨 Visual Excellence
🖼️ Professional Chart Presentation:
🔵 EMA12 (Blue line)
🔴 EMA21 (Red line)
🟢 Long entry backgrounds
🔴 Short entry backgrounds
🎯 Stop loss and take profit levels
🏷️ Entry/exit labels
📊 Performance Optimized
⚡ Built for Speed & Accuracy:
🚀 Efficient Pine Script v5 code
🎯 Precise mathematical calculations
🔄 Real-time condition checking
📱 Optimized for all timeframes
💾 Memory-efficient execution
🎪 Why Traders Love This Strategy
✅ High Win Rate Potential: Catches strong momentum moves after rejection
✅ Clear Entry/Exit Rules: No guesswork or emotional decisions
✅ Excellent Risk Management: Fixed R:R with automatic stops
✅ Trend-Following Edge: Only trades with the dominant trend
✅ Multiple Timeframe Friendly: Works on various timeframes
✅ Comprehensive Alerts: Never miss a trading opportunity
✅ Professional Grade: Institution-quality logic and execution
Made by NickGolobor.GM

BB Cross + Martingale Hedging Strategy🔁 Buy and Sell Trend Indicator (Multi-Entry Trend Follower)
This indicator detects bullish and bearish trends based on candle direction and highlights trend shifts with multiple entry opportunities.
🔍 Features:
Buy Signals: Triggered when a bullish candle follows a bearish one, initiating a potential upward trend.
Sell Signals: Triggered when a bearish candle follows a bullish one, signaling potential downward momentum.
Multi-Entry Logic: Captures up to 5 consecutive entries in the same trend to compound positions or confirm strength.
Visual Labels: Clearly marked buy/sell labels and trend continuation counts on the chart.
Color-coded Backgrounds: Light green/red highlights for bullish/bearish candles.
Alerts: Set real-time alerts for trend reversals and continuation signals, ensuring you're notified instantly.
🧠 Ideal For:
Trend-following traders looking for clear entry points.
Scalpers and swing traders who want to track momentum shifts.
Users who prefer visual confirmations and real-time alerts.

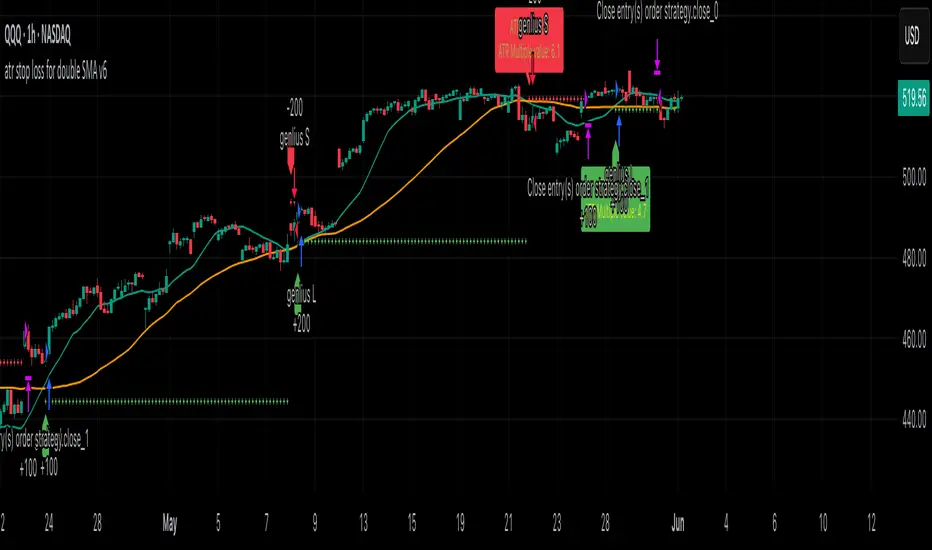
atr stop loss for double SMA v6Strategy Name
atr stop loss for double SMA v6
Credit: This v6 update is based on Daveatt’s “BEST ATR Stop Multiple Strategy.”
Core Logic
Entry: Go long when the 15-period SMA crosses above the 45-period SMA; go short on the inverse cross.
Stop-Loss: On entry, compute ATR(14)×2.0 and set a fixed stop at entry ± that amount. Stop remains static until hit.
Trend Tracking: Uses barssince() to ensure only one active long or short position; stop is only active while that trend persists.
Visualization
Plots fast/slow SMA lines in teal/orange.
On each entry bar, displays a label showing “ATR value” and “ATR×multiple” positioned at the 30-bar low (long) or high (short).
Draws an “×” at the stop-price level in green (long) or red (short) while the position is open.
Execution Settings
Initial Capital: $100 000, Size = 100 shares per trade.
Commission: 0.075% per trade.
Pyramiding: 1.
Calculations: Only on bar close (no intra-bar ticks).
Usage Notes
Static ATR stop adapts to volatility but does not trail.
Ideal for trending, liquid markets (stocks, futures, FX).
Adjust SMA lengths or ATR multiple for faster/slower signals.
System 0530 - Stoch RSI Strategy with ATR filterStrategy Description: System 0530 - Multi-Timeframe Stochastic RSI with ATR Filter
Overview:
This strategy, "System 0530," is designed to identify trading opportunities by leveraging the Stochastic RSI indicator across two different timeframes: a shorter timeframe for initial signal triggers (assumed to be the chart's current timeframe, e.g., 5-minute) and a longer timeframe (15-minute) for signal confirmation. It incorporates an ATR (Average True Range) filter to help ensure trades are taken during periods of adequate market volatility and includes a cooldown mechanism to prevent rapid, successive signals in the same direction. Trade exits are primarily handled by reversing signals.
How It Works:
1. Signal Initiation (e.g., 5-Minute Timeframe):
Long Signal Wait: A potential long entry is considered when the 5-minute Stochastic RSI %K line crosses above its %D line, AND the %K value at the time of the cross is at or below a user-defined oversold level (default: 30).
Short Signal Wait: A potential short entry is considered when the 5-minute Stochastic RSI %K line crosses below its %D line, AND the %K value at the time of the cross is at or above a user-defined overbought level (default: 70). When these conditions are met, the strategy enters a "waiting state" for confirmation from the 15-minute timeframe.
2. Signal Confirmation (15-Minute Timeframe):
Once in a waiting state, the strategy looks for confirmation on the 15-minute Stochastic RSI within a user-defined number of 5-minute bars (wait_window_5min_bars, default: 5 bars).
Long Confirmation:
The 15-minute Stochastic RSI %K must be greater than or equal to its %D line.
The 15-minute Stochastic RSI %K value must be below a user-defined threshold (stoch_15min_long_entry_level, default: 40).
Short Confirmation:
The 15-minute Stochastic RSI %K must be less than or equal to its %D line.
The 15-minute Stochastic RSI %K value must be above a user-defined threshold (stoch_15min_short_entry_level, default: 60).
3. Filters:
ATR Volatility Filter: If enabled, trades are only confirmed if the current ATR value (converted to ticks) is above a user-defined minimum threshold (min_atr_value_ticks). This helps to avoid taking signals during periods of very low market volatility. If the ATR condition is not met, the strategy continues to wait for the condition to be met within the confirmation window, provided other conditions still hold.
Signal Cooldown Filter: If enabled, after a signal is generated, the strategy will wait for a minimum number of bars (min_bars_between_signals) before allowing another signal in the same direction. This aims to reduce overtrading.
4. Entry and Exit Logic:
Entry: A strategy.entry() order is placed when all trigger, confirmation, and filter conditions are met.
Exit: This strategy primarily uses reversing signals for exits. For example, if a long position is open, a confirmed short signal will close the long position and open a new short position. There are no explicit take profit or stop loss orders programmed into this version of the script.
Key User-Adjustable Parameters:
Stochastic RSI Parameters: RSI Length, Stochastic RSI Length, %K Smoothing, %D Smoothing.
Signal Trigger & Confirmation:
5-minute %K trigger levels for long and short.
15-minute %K confirmation thresholds for long and short.
Wait window (in 5-minute bars) for 15-minute confirmation.
Filters:
Enable/disable and configure the Signal Cooldown filter (minimum bars between signals).
Enable/disable and configure the ATR Volatility filter (ATR period, minimum ATR value in ticks).
Strategy Parameters:
Leverage Multiplier (Note: This primarily affects theoretical position sizing for backtesting calculations in TradingView and does not simulate actual leveraged trading risks).
Recommendations for Users:
Thorough Backtesting: Test this strategy extensively on historical data for the instruments and timeframes you intend to trade.
Parameter Optimization: Experiment with different parameter settings to find what works best for your trading style and chosen markets. The default values are starting points and may not be optimal for all conditions.
Understand the Logic: Ensure you understand how each component (Stochastic RSI on different timeframes, ATR filter, cooldown) interacts to generate signals.
Risk Management: Since this version does not include explicit stop-loss orders, ensure you have a clear risk management plan in place if trading this strategy live. You might consider manually adding stop-loss orders through your broker or using TradingView's separate strategy order settings for stop-loss if applicable.
Disclaimer:
This strategy description is for informational purposes only and does not constitute financial advice. Past performance is not indicative of future results. Trading involves significant risk of loss. Always do your own research and understand the risks before trading.

Support Resistance StrategyThis Pine Script (version 5) implements the "Support Resistance Strategy," adapted from the original indicator by TradingView user @LonesomeTheBlue The strategy identifies support and resistance levels based on pivot points and executes trades when the price breaks these levels, incorporating a 0.1% commission per trade and percentage-based stop loss and take profit mechanisms for risk management.
Strategy Overview
The strategy generates long trades when the price breaks above a resistance level and short trades when it breaks below a support level.
It accounts for trading costs with a configurable 0.1% commission per trade.
Stop loss and take profit levels are set as percentages of the entry price to manage risk.
Only one position (long or short) can be open at a time to avoid excessive orders.
Key Inputs
Pivot Period (prd): Defines the lookback period for detecting pivot highs and lows (default: 10 bars).
Source (ppsrc): Allows selection between High/Low or Close/Open for pivot calculations (default: High/Low).
Maximum Channel Width % (ChannelW): Limits the width of support/resistance channels as a percentage of the 300-bar price range (default: 5%).
Minimum Strength (minstrength): Specifies the minimum number of pivot points required to form a valid support/resistance channel (default: 0).
Maximum Number of S/R (maxnumsr): Caps the number of support/resistance channels displayed (default: 6).
Loopback Period (loopback): Sets the timeframe for analyzing pivots to calculate support/resistance levels (default: 290 bars).
Stop Loss % (sl_percent): Defines the stop loss as a percentage below/above the entry price (default: 2%).
Take Profit % (tp_percent): Defines the take profit as a percentage above/below the entry price (default: 4%).
Moving Averages: Optional 50-period and 200-period SMA or EMA for trend context (disabled by default).
Colors: Configurable colors for resistance (red), support (lime), and price within a channel (gray).
Extras: Options to display pivot points (showpp) and broken support/resistance levels (showsrbroken).
How It Works
Pivot Detection: Identifies pivot highs and lows using the ta.pivothigh and ta.pivotlow functions, based on the selected source (High/Low or Close/Open).
Support/Resistance Channels: Groups pivot points within a maximum channel width (calculated as a percentage of the 300-bar range) to form support and resistance zones. Channels are sorted by strength, determined by the number of pivot points and price interactions within the channel.
Breakout Signals:
Long Entry: Triggered when the price closes above a resistance level (resistancebroken condition) and no position is currently open.
Short Entry: Triggered when the price closes below a support level (supportbroken condition) and no position is currently open.
Trade Exits: Each trade has a stop loss (sl_percent) and take profit (tp_percent) calculated relative to the entry price. Exits occur only when a position is open, and the position is closed before a new entry is allowed.
Commission: A 0.1% commission is applied per trade, adjustable via the commission_value parameter.
Visual Indicators
Support and resistance channels are displayed as colored boxes (red for resistance, lime for support, gray when the price is within a channel).
Pivot points, if enabled, are shown as "H" (high) or "L" (low) labels on the chart.
Breakout signals are marked with green triangles for resistance breaks and red triangles for support breaks when showsrbroken is enabled.
Debug labels ("R Break" for resistance, "S Break" for support) are added to confirm breakout detection.
Optional moving averages (50-period and 200-period) can be plotted to provide trend context.
Alerts
Resistance Broken: Triggers when the price breaks above a resistance level, signaling a potential long entry.
Support Broken: Triggers when the price breaks below a support level, signaling a potential short entry.
Usage Guidelines
Backtesting: Utilize TradingView’s Strategy Tester to evaluate the strategy’s performance on your chosen asset and timeframe. Adjust parameters such as prd, ChannelW, sl_percent, and tp_percent to optimize results.
Commission: Set commission_value to match your broker’s fee structure (e.g., 0.1% is typical for cryptocurrency exchanges like Binance).
Risk Management: The default settings provide a 1:2 risk-reward ratio (2% stop loss, 4% take profit). Modify these based on your risk tolerance and market conditions.
Market Suitability: The strategy performs best in markets with clear support and resistance levels, such as trending or range-bound markets. Test on assets like stocks, forex, or cryptocurrencies.
False Breakouts: Breakout signals may be prone to noise. Consider adding filters, such as moving average trend confirmation, to reduce false entries.
How to Implement in TradingView
Copy the script into the TradingView Pine Editor.
Click "Add to Chart" to apply the strategy.
Adjust input parameters in the Settings panel to suit your asset and timeframe.
Use the Strategy Tester to analyze performance metrics, including net profit, drawdown, and win rate.
Configure alerts for "Resistance Broken" or "Support Broken" to receive real-time notifications.
Disclaimer
This strategy is adapted from the original indicator by @This Pine Script (version 5) implements the "Support Resistance Strategy," adapted from the original indicator by TradingView user LonesomeTheBlue. The strategy identifies support and resistance levels based on pivot points and executes trades when the price breaks these levels, incorporating a 0.1% commission per trade and percentage-based stop loss and take profit mechanisms for risk management. It ensures only one position is open at a time to prevent excessive order generation. Below is a professional, structured explanation for TradingView users.
Strategy Overview
The strategy generates long trades when the price breaks above a resistance level and short trades when it breaks below a support level.
It accounts for trading costs with a configurable 0.1% commission per trade.
Stop loss and take profit levels are set as percentages of the entry price to manage risk.
Only one position (long or short) can be open at a time to avoid excessive orders.
Key Inputs
Pivot Period (prd): Defines the lookback period for detecting pivot highs and lows (default: 10 bars).
Source (ppsrc): Allows selection between High/Low or Close/Open for pivot calculations (default: High/Low).
Maximum Channel Width % (ChannelW): Limits the width of support/resistance channels as a percentage of the 300-bar price range (default: 5%).
Minimum Strength (minstrength): Specifies the minimum number of pivot points required to form a valid support/resistance channel (default: 0).
Maximum Number of S/R (maxnumsr): Caps the number of support/resistance channels displayed (default: 6).
Loopback Period (loopback): Sets the timeframe for analyzing pivots to calculate support/resistance levels (default: 290 bars).
Stop Loss % (sl_percent): Defines the stop loss as a percentage below/above the entry price (default: 2%).
Take Profit % (tp_percent): Defines the take profit as a percentage above/below the entry price (default: 4%).
Moving Averages: Optional 50-period and 200-period SMA or EMA for trend context (disabled by default).
Colors: Configurable colors for resistance (red), support (lime), and price within a channel (gray).
Extras: Options to display pivot points (showpp) and broken support/resistance levels (showsrbroken).
How It Works
Pivot Detection: Identifies pivot highs and lows using the ta.pivothigh and ta.pivotlow functions, based on the selected source (High/Low or Close/Open).
Support/Resistance Channels: Groups pivot points within a maximum channel width (calculated as a percentage of the 300-bar range) to form support and resistance zones. Channels are sorted by strength, determined by the number of pivot points and price interactions within the channel.
Breakout Signals:
Long Entry: Triggered when the price closes above a resistance level (resistancebroken condition) and no position is currently open.
Short Entry: Triggered when the price closes below a support level (supportbroken condition) and no position is currently open.
Trade Exits: Each trade has a stop loss (sl_percent) and take profit (tp_percent) calculated relative to the entry price. Exits occur only when a position is open, and the position is closed before a new entry is allowed.
Commission: A 0.1% commission is applied per trade, adjustable via the commission_value parameter.
Visual Indicators
Support and resistance channels are displayed as colored boxes (red for resistance, lime for support, gray when the price is within a channel).
Pivot points, if enabled, are shown as "H" (high) or "L" (low) labels on the chart.
Breakout signals are marked with green triangles for resistance breaks and red triangles for support breaks when showsrbroken is enabled.
Debug labels ("R Break" for resistance, "S Break" for support) are added to confirm breakout detection.
Optional moving averages (50-period and 200-period) can be plotted to provide trend context.
Alerts
Resistance Broken: Triggers when the price breaks above a resistance level, signaling a potential long entry.
Support Broken: Triggers when the price breaks below a support level, signaling a potential short entry.
Usage Guidelines
Backtesting: Utilize TradingView’s Strategy Tester to evaluate the strategy’s performance on your chosen asset and timeframe. Adjust parameters such as prd, ChannelW, sl_percent, and tp_percent to optimize results.
Commission: Set commission_value to match your broker’s fee structure (e.g., 0.1% is typical for cryptocurrency exchanges like Binance).
Risk Management: The default settings provide a 1:2 risk-reward ratio (2% stop loss, 4% take profit). Modify these based on your risk tolerance and market conditions.
Market Suitability: The strategy performs best in markets with clear support and resistance levels, such as trending or range-bound markets. Test on assets like stocks, forex, or cryptocurrencies.
False Breakouts: Breakout signals may be prone to noise. Consider adding filters, such as moving average trend confirmation, to reduce false entries.
How to Implement in TradingView
Copy the script into the TradingView Pine Editor.
Click "Add to Chart" to apply the strategy.
Adjust input parameters in the Settings panel to suit your asset and timeframe.
Use the Strategy Tester to analyze performance metrics, including net profit, drawdown, and win rate.
Configure alerts for "Resistance Broken" or "Support Broken" to receive real-time notifications.
Disclaimer
This strategy is adapted from the original indicator by @LonesomeTheBlue with modifications to include commission, stop loss, take profit features, and order limit controls. Trading involves significant financial risks, and past performance is not indicative of future results. No trading strategy, including this one, guarantees profits. Users must thoroughly backtest and forward-test the strategy on TradingView before deploying it in live trading. Performance depends on the asset, timeframe, and market conditions. The author assumes no responsibility for any financial losses incurred. Consult a qualified financial advisor before engaging in trading activities., with modifications to include commission, stop loss, take profit features, and order limit controls. Trading involves significant financial risks, and past performance is not indicative of future results. No trading strategy, including this one, guarantees profits. Users must thoroughly backtest and forward-test the strategy on TradingView before deploying it in live trading. Performance depends on the asset, timeframe, and market conditions. The author assumes no responsibility for any financial losses incurred. Consult a qualified financial advisor before engaging in trading activities.

Rifaat Ultra Gold AI v6.1🔄 SL moves with each new candle if the price moves in favor of the trade.
🟢 Break-Even Protection
If a certain profit percentage is reached, the SL is moved to the entry point (zero loss).
🔕 Audio and Visual Alerts
A sound notification on buy/sell signals.
A visual alert on the screen.
🎛️ Settings Control
Adjustable from the settings menu.

Golden Triangle Strategy (1H, Setup 1 & 2)🔺 Golden Triangle Strategy – Setup 1 & 2 with Dynamic Trailing Stop (Optimized for 1H Chart)
### 📘 Strategy Summary
This strategy blends **technical pattern recognition** with **volume confirmation** and **dynamic risk management** to capture high-probability breakouts. It features two independent entry setups . More details can be found at thepatternsite.com
I have added intelligent trailing stop that **tightens once a profit threshold is reached**. Please note that this is not mentioned in GoldenTriangle strategy. I just added to capture the profits.
### ✅ Entry Setups
#### **Setup 1 – Golden Triangle Breakout**
* Detects **triangle formations** using recent pivot highs and lows.
* A **bullish breakout** is confirmed when:
* Price **closes above the triangle top**, and
* Price is also **above the 50-period SMA**.
* Entry: At breakout candle close.
* Ideal for early momentum trades after consolidation.
#### **Setup 2 – Price + Volume Confirmation**
* Based on **mean reversion followed by volume surge**:
* Price drops **below the 50 SMA**, then closes **back above it**.
* Requires at least one **"up day"** (current close > previous close).
* Volume must be:
* Above its 50-SMA, **and**
* Higher than each of the **previous 4 days**.
* Entry: At the close of volume-confirmation day.
* Useful when triangle patterns are not clear, but accumulation is strong.
---
### 📈 Entry Logic Recap
| Condition | Setup 1 | Setup 2 |
| ------------------ | --------------------- | --------------------------------------- |
| Pattern | Triangle Breakout | SMA Reclaim + Volume Surge |
| SMA Filter | Close > 50 SMA | Price drops < 50 SMA, then closes above |
| Volume Requirement | Not Required | > Volume SMA + > last 4 bars |
| Entry Trigger | Breakout candle close | After volume confirmation |
---
### 🚪 Exit Strategy
#### 🔁 **Trailing Stop Loss (TSL)**
* **Initial stop:** 10% below the **highest price reached** after entry.
* **Tightening rule:**
* When profit reaches **10%**, the trailing stop is **tightened to 5%**.
* This keeps you in the trade while locking in more profit as the trade moves in your favor.
#### 🔻 **Manual Close**
* If the price drops below the trailing stop, the position is automatically closed using `strategy.close()`.
---
### 🌈 Visual Aids & Additions
* Green background shading while in a trade.
* Real-time dashboard showing:
* SMA values
* Entry signals
* Plots for:
* Dynamic trailing stop
* Weekly Fibonacci R3 and S3 levels as outer support/resistance zones.
---
### 🧠 Ideal Use Cases
* Works well on **1-hour charts** for intraday to short swing trades.
* Especially effective in **sideways-to-bullish markets**.
* Helps avoid false breakouts by using SMA and volume filters.
---
Tip: I also showed weekly R3 on the chart. When the price touches at this level lock your profits. You Dont have to wait until price hits trailing stop loss.
warning : This strategy is published educational purposes only.

Trend Signals StrategyThis strategy is designed to follow the dominant market trend and only take trades in the direction of that trend. It uses two moving averages for trend detection and candlestick confirmation for entries. The strategy can be used on any timeframe but works best on 15m to 1H for intraday trading.

Volatility Break + Trend Bias Scalper [Enhanced Visuals]Volatility Break + Trend Bias Scalper \
Overview
This strategy is designed to help traders catch high-probability breakout moves by combining real-time volatility surges with higher timeframe trend confirmation. It is particularly useful in markets like AAPL, BTC, NASDAQ, and Forex pairs where volatility and momentum often occur in bursts.
📈 Strategy Logic
🎯 1. Volatility Spike Detection
The core entry trigger is based on identifying sudden ATR-based volatility bursts:
* ATR(7) is compared to its EMA(14) smoothing.
* A volatility spike is confirmed when ATR exceeds `1.5x` the smoothed ATR.
This helps avoid entering during sideways price action and focuses only on explosive breakouts.
🧭 2. Higher Timeframe Trend Filter
To improve signal quality, the strategy checks the EMA(200) slope from a higher timeframe (e.g., 15min while trading on 3/5/45min charts):
* Bullish trend: EMA rising
* Bearish trend: EMA falling
This ensures we only trade in the direction of larger momentum.
🧠 3. Structure Break Entry
A simple but effective price action confirmation:
* Long: Close > highest close of the last 2 candles
* Short: Close < lowest close of the last 2 candles
This avoids "fake" moves and choppy zones.
🎛️ 4. Risk/Reward and Exit Logic
* Take Profit (TP) = 1.5× ATR (configurable)
* Stop Loss (SL) = 1.0× ATR (configurable)
* You can adjust this for more aggressive or conservative setups.
✅ All exits are calculated dynamically using the current ATR at trade entry.
🖥️ Visual Enhancements
This version includes:
✅ Signal markers (🔴 for Short, 🟢 for Long)
✅ Trend-colored background zones
✅ TP/SL lines drawn on chart
✅ Toggle options to enable/disable labels and TP/SL lines
These visuals help traders quickly validate signals, backtest more effectively, and share setups with clarity.
🧪 Backtest Settings
* Position Size: 1% of equity
* Commission: 0
* Slippage: Assumed minimal
* Recommended Markets: AAPL (45m), BTCUSD (5m–15m), NAS100 (15m), EUR/USD (5m)
> You can tune the strategy further using `PineScriptsAI`.
⚠️ Disclaimer
This strategy is for **educational purposes only**. It does **not constitute financial advice** or guarantees of profitability. Backtest results may vary across assets, timeframes, and market conditions.
Always validate with forward testing and sound risk management.
🔗 Built With Help From PineScriptsAI
Want to build your own version or add:
* Time filters (e.g., NY or London session)?
* Multi-take-profits or trailing stop?
* Auto alert bots to Telegram/Discord?

Big_RSI_EMA_FibStrategy Name: Big Candle + RSI + EMA + Fibonacci
This Pine Script strategy combines multiple indicators and price action logic to generate long and short trading signals. It includes:
🔧 Inputs
RSI Period – default: 14 (Relative Strength Index to identify overbought/oversold conditions).
EMA Period – default: 50 (Exponential Moving Average for trend confirmation).
Fibonacci Retracement – default: 0.618 (used to identify pullback zones after a big candle).
Minimum Body Size % – default: 1.5% (the minimum percentage of candle body relative to full range to qualify as a "big candle").
📈 Indicators Used
RSI: Filters overbought/oversold conditions.
EMA (50): Confirms trend direction.
Big Candle Detection: Candles with body size greater than a specified percentage of their full range.
Fibonacci Levels: A retracement level (default 61.8%) is calculated from the body of the big candle.
✅ Long Entry Conditions
Big bullish candle (close > open)
Body size greater than threshold
RSI is below 70
Price is above EMA(50)
❌ Short Entry Conditions
Big bearish candle (close < open)
Body size greater than threshold
RSI is above 30
Price is below EMA(50)
🎯 Strategy Actions
Enters long or short positions based on the above conditions.
On each entry, a horizontal line is drawn at the entry price (close) and extended forward for 3 bars to visually mark the trade level.
Green line for long entries.
Red line for short entries.
📐 Visual Elements
EMA line (orange)
Buy/Sell Labels: Up/down labels on the chart at entry points.
Fibonacci Level (purple): Retracement level based on the big candle.
Horizontal Trade Lines: Lines marking the entry price for quick visual tracking.
⏱️ Multi-Timeframe Data
Fetches high/low from:
5-minute chart
1-hour chart
(Prepared for potential additional filtering or breakout logic.)

SwingTrade ADX Strategy v6**Overview:**
This Pine Script™ strategy is designed for swing trading, primarily utilizing the Volume Weighted Average Price (VWAP) as a core component. It aims to identify potential entry and exit points by analyzing price action relative to the VWAP, an optional ADX filter for trend strength, and an optional volume ratio filter for confirmation. The strategy is highly customizable, allowing users to enable/disable individual signal components and adjust their parameters.
**Key Features & Indicators Used:**
* **VWAP (Volume Weighted Average Price):** The central indicator, reset daily.
* **VWAP Delta:** Calculates the percentage deviation of the closing price from the VWAP. The strategy looks for rising/falling delta momentum.
* **ADX (Average Directional Index):** An optional filter to gauge trend strength. Trades can be filtered to only occur when ADX is above a defined threshold and DMI lines (+DI vs -DI) align with the trade direction.
* **Volume Ratio:** An optional filter comparing the sum of volume traded when the price is above VWAP versus below VWAP over a specified period. This helps gauge bullish/bearish volume pressure.
* **Customizable Backtesting Period:** Users can define a specific start and end date for backtesting.
* **Toggleable Components:** VWAP, ADX, and Volume signals can be individually enabled or disabled.
**How It Works - Logic:**
1. **VWAP Signals (Optional - Disabled by Default):**
* **Long Condition:** If enabled, a potential long entry is considered when the price crosses above the VWAP, the VWAP delta is rising (indicating momentum building away from VWAP), and the price is a certain percentage above the VWAP (sensitivity).
* **Short Condition:** If enabled, a potential short entry is considered when the price crosses below the VWAP, the VWAP delta is falling, and the price is a certain percentage below the VWAP.
2. **ADX Filter (Optional - Enabled by Default):**
* If enabled, trades are only considered if the ADX value is above a user-defined threshold (indicating a strong trend) AND the Directional Movement Index (DMI) lines (+DI and -DI) confirm the trade direction (e.g., +DI > -DI for longs).
3. **Volume Ratio Filter (Optional - Enabled by Default):**
* If enabled, for a long trade, the ratio of volume traded above VWAP to volume traded below VWAP must exceed a bullish threshold. For a short trade, this ratio must be below a bearish threshold (implying more volume traded below VWAP).
4. **Entry Signal:**
* A final `buySignal` or `sellSignal` is generated only if ALL enabled conditions (VWAP, ADX, Volume) are met and the trade falls within the selected `dateFilter`.
* The strategy enters a trade only if there are no other open trades (`strategy.opentrades == 0`).
5. **Exit Signal:**
* Exits are designed to capture a potential shift in momentum relative to the VWAP delta.
* **Exit Long:** If in a long position, the price is above VWAP, AND the VWAP delta (which was previously rising during the trade) starts to fall.
* **Exit Short:** If in a short position, the price is below VWAP, AND the VWAP delta (which was previously falling during the trade) starts to rise.
**Customization & Inputs:**
Users can adjust the following via the script's settings:
* **Backtest Settings:** `Backtest Start` and `Backtest End` dates.
* **Display:** Toggle `Show VWAP` line and `Show Labels` for signals.
* **Enable Indicators:** Individually enable/disable `VWAP Signals` (default: OFF), `Enable ADX Filter` (default: ON), `Enable Volume Signals` (default: ON).
* **VWAP Parameters:** `VWAP Signal Period (for Delta)` and `VWAP Signal Sensitivity (%)`.
* **ADX Parameters:** `ADX Period` and `ADX Threshold`.
* **Volume Parameters:** `Volume Period` and `Volume Ratio Threshold`.
**Visuals on Chart:**
* Plots the VWAP line (if enabled).
* Plots `BUY ENTRY` (green triangle up) and `SELL ENTRY` (red triangle down) markers.
* Plots `EXIT BUY` (lime cross) and `EXIT SELL` (orange cross) markers.
* Optional text labels for each signal type.
* An information panel in the top-right corner displaying current values for VWAP Delta %, ADX, and Volume Ratio.
---
**Regarding "Ideal Settings for Profit":**
**IMPORTANT DISCLAIMER: There are NO universally "ideal" or "guaranteed profitable" settings for any trading strategy, including this one. Market conditions are dynamic and vary significantly across different assets, timeframes, and periods.**
The profitability of any trading strategy depends on a multitude of factors, including:
* The specific asset being traded (e.g., Forex, Crypto, Stocks, Indices).
* The chosen timeframe (e.g., 1-minute, 1-hour, Daily).
* Current market volatility and prevailing market conditions (trending, ranging).
* Broker commissions, spreads, and slippage.
* Proper risk management.
**Finding Potentially Suitable Settings is a Process of Rigorous Backtesting and Optimization:**
1. **Start with Default Settings (or a Baseline):**
* This script defaults to having `VWAP Signals` OFF, and `ADX Filter` and `Volume Signals` ON. You can start here or enable VWAP signals for your initial tests.
2. **Systematic Backtesting:**
* Choose a specific asset and timeframe you are interested in.
* Use TradingView's Strategy Tester to run the script on historical data over a significant period.
3. **Iterate and Observe:**
* Adjust one parameter at a time and observe its effect on key performance metrics (e.g., Net Profit, Profit Factor, Max Drawdown, Win Rate, Number of Trades).
* **Example areas to explore (NOT recommendations, but a methodological approach):**
* **Enabling VWAP Signals:** See how performance changes.
* `vwapSignalSensitivity (%)`: Try values like 0.2%, 0.5%, 0.75%, 1.0%. Higher values mean the price needs to be further from VWAP.
* `adxThreshold`: Try values like 20, 25, 30. Higher values require a stronger trend.
* `volumeRatioThreshold`: Try values like 1.2, 1.5, 2.0. Higher values require stronger volume confirmation.
* `vwapSignalPeriod`, `adxPeriod`, `volumePeriod`: Shorter periods make indicators more responsive but potentially noisier; longer periods make them smoother but potentially laggier.
4. **Avoid Over-Optimization:**
* Be wary of settings that look "perfect" on one specific historical data set. They might be "curve-fitted" and may not perform well in live trading or on different data. Look for robustness – settings that perform reasonably well across slightly varied parameters or different (but similar) time periods.
5. **Consider the Number of Trades:**
* Extremely high or low numbers of trades can be problematic. Too few trades might not give a statistically significant result. Too many trades might rack up commissions.
6. **Forward Testing (Paper Trading):**
* Once you find settings that look promising in backtests, test them in a paper trading environment before risking real capital.
**This script is provided for educational and informational purposes only. It does not constitute financial advice. All trading involves a significant risk of loss. Past performance is not indicative of future results. Use this script and any trading strategy at your own risk.**
---

Test_MACD-English-
Sample MACD-Based Trading Strategy
1. Buy: Enter a long position when the MACD Histogram is greater than 0 and increasing, AND the current price is greater than the highest price of the previous 20 periods. Exit the trade when the MACD Histogram falls below 0 or when the stop-loss level is hit. Set the stop-loss level at the lowest price of the last 3 candlesticks when entering the trade.
2. Sell: The conditions for selling are the opposite of the buy conditions.

Range Filter StrategyThe Range Filter Strategy, based on @DonovanWall Range Filter indicator, is a trend-following trading system designed for TradingView. It identifies price trends by filtering market noise using a dynamic range based on user-defined metrics.
Functionality
Core Mechanism: The strategy calculates a central filter line (filt) with upper (h_band) and lower (l_band) bands, determined by price range and smoothing parameters, to detect trend direction.
Trend Signals:
Uptrend: Initiates a long entry when the filter line rises (filt > filt ).
Downtrend: Initiates a short entry when the filter line falls (filt < filt ).
Range Calculation: The range size is configurable using metrics such as ATR, Standard Deviation, or Percentage of Price, scaled by a user-defined quantity (rng_qty).
Smoothing: Optional EMA-based smoothing (smooth_range) refines the range to reduce false signals.
Entry/Exit Rules:
Entries: Long or short positions are opened when the trend direction changes.
Exits: Stop-loss and take-profit levels are set using the filter range, scaled by multipliers (sl_multiplier, tp_multiplier).
Position Sizing: Risks a fixed percentage of equity (default 1%) per trade, calculated based on stop-loss distance.
Commission: Incorporates trading costs (default 0.1% per trade), adjustable to match broker fees.
Key Features
Inputs:
Filter Type: Select between Type 1 (basic range filter) or Type 2 (step-based filter).
Movement Source: Choose wicks (high/low) or close prices.
Range Scale: Options include Pips, Points, Ticks, % of Price, ATR, Average Change, or Standard Deviation.
Smoothing: Enable/disable range smoothing and set period.
Risk Management: Configure risk per trade, stop-loss, and take-profit multipliers.
Visuals: Plots the filter line (green for uptrend, red for downtrend) and bands (transparent green/red). Fills between bands enhance visibility.
Output: Provides trend signals (fdir) for external use.
Usage Instructions
Setup: Apply to any chart (e.g., forex, stocks, crypto) and timeframe. Adjust inputs such as rng_qty, rng_per, sl_multiplier, and tp_multiplier to optimize for specific markets.
Trading: Enter long positions on green filter line uptrends and short positions on red filter line downtrends. Exits are automated via stop-loss and take-profit.
Backtesting: Use TradingView's strategy tester to evaluate performance and refine parameters for profitability.
Commission: Set commission_value to align with your broker’s fees for accurate net profit calculations.
Disclaimer
The Range Filter Strategy is provided for educational and informational purposes only and does not constitute financial advice. Trading carries significant risks, including potential loss of capital, and is not suitable for all investors. Past performance is not indicative of future results. Users are solely responsible for their trading decisions and should conduct thorough backtesting and validation on TradingView before deploying real capital. Adjust parameters and commission settings to reflect your broker and market conditions. Consult a qualified financial advisor prior to trading. The developers and associated parties are not liable for any losses incurred.

LinReg Candle Strategy - Arrows at LinReg High/LowVisual Result:
✅ Arrows appear exactly at the smoothed candle low (buy) or high (sell)
✅ Still uses strategy entries (you can backtest)
✅ Clean layout with LinReg candles and EMAs

GStrategy with Long & Short WIF 1hThis is a 4-hour chart strategy for cryptocurrency trading, combining RSI-based divergence signals and trend filters. The script identifies bullish and bearish divergences, and executes long and short entries based on RSI levels. It limits holding time per trade, controls risk with stop-loss and take-profit levels, and provides visual markers for entries and exits. The strategy is designed for intraday to swing trading, aiming for consistent small gains with minimal losses.
